Tuesday, October 30, 2012

Export HTML to excel using jQuery and asp.net

Here we will see how to export a HTML table content to excel using asp.net web form and C# using jQuery.

Let’s start with a small piece of code –
    <h2>
        Export to excel using jquery
    </h2>

    <a href="#" class="expToExcel">Export to excel</a>
    <div id="toReport">
    <table>
        <tr>
          <th>Name</th>
          <th>Age</th>
          <th>Email</th>
        </tr>
        <tr>
          <td>John</td>
          <td>44</td>
          <td>john@gmail.com</td>
        </tr>
        <tr>
          <td>Rambo</td>
          <td>33</td>
          <td>rambo@gmail.com</td>
        </tr>
        <tr>
          <td>It's hot</td>
          <td>33</td>
          <td>test@hotmail.com</td>
        </tr>
    </table>
    </div>
On click of "Export to excel" let do export the content to excel file using jQuery. We can do this in following steps-
  1. Get the HTML content.
  2. Encode the HTML content.
  3. Pass the HTML encoded content to an aspx page.
  4. Generate the excel file from code behind.
Step 1-
var data = $("#toReport").html();
data = escape(data);
Why we are escaping the HTML data and then passing to code behind. Answer is that we are going to pass the data to an aspx page using a dynamically created form. It is going to through "A potentially dangerous Request.Form value was detected from the client" error. That’s why we are escaping the HTML content.

Step 2-
$('body').prepend("<form method='post' action='exportPage.aspx' style='top:-3333333333px;' id='tempForm'><input type='hidden' name='data' value='" + data + "' ></form>");
$('#tempForm').submit();
$("tempForm").remove();
In this step we are adding an aspx page named exportPage.aspx. And creating a form tag on the fly, add the HTML data to a hidden field and submit the form using jQuery. And finally remove the added form tag.

Step 3 & 4-
        string data = Request.Form["data"];
        data = HttpUtility.UrlDecode(data);
        Response.Clear();
        Response.AddHeader("content-disposition", "attachment;filename=report.xls");
        Response.Charset = "";
        Response.ContentType = "application/excel";
        HttpContext.Current.Response.Write( data );
        HttpContext.Current.Response.Flush();
        HttpContext.Current.Response.End();
In this step we are simply creating the excel file and flushing the result as excel. You may see a message saying corrupt excel file do you want to open the file. You can open the file not an issue. I am too lazy to fine out proper setting.

You can also download the code from here.
Wednesday, October 3, 2012

Progress bar for long running process with steps using asp.net, C#, SignalR

I have come across with many questions regarding implementing progress of some long running operations in asp.net application. And I could not see any way to solve this problem directly in asp.net. Even with ajax call to get what step is running is not possible because once a long process has started, the server cannot listen to an ajax request until the previous step is finished. This is because the processing is done as a single thread.

Thanks to Microsoft for VS 2010 and SignalR.

Here we will try to implement a demo progress of long running application step by step using SignalR and visual studio 2010.

Step 1- Install signal R
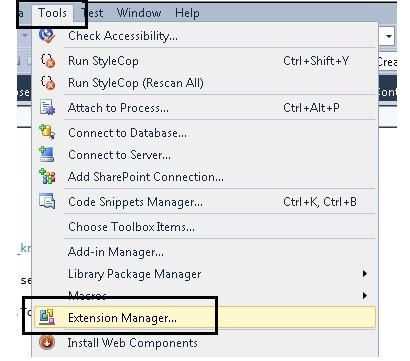
Check whether NuGet package manager is installed with your visual studio. If not go to tool -> Extension manager this will pop up the following window-


Go to online gallery, if you cannot see NuGet Package Manager, then search on the search box on the left side. Install it.

Create a web application with dot net framework 4, and then right click on the project and then click on Manage NuGet Packages… This will pop up the above window again like below-


Go to online then type signalr in the search box. This will list SignalR as the first item. Click on install.

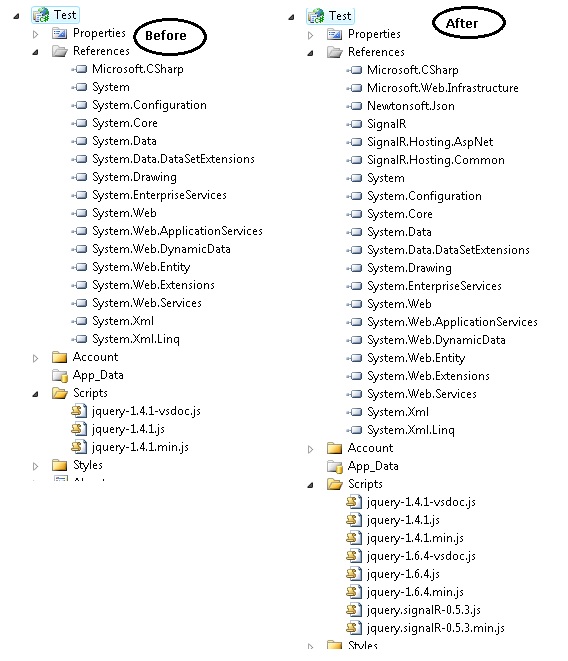
If you note down the reference of your project and the js file you can see the following difference-


Step 2-
First we will create a class named ServerComplexObjectand inherit this from SignalR.Hubs.Hub. And we will add a method named ComplexProcess() like below-
    public class ServerComplexObject:SignalR.Hubs.Hub {
        public void ComplexProcess()
        {
            System.Threading.Thread.Sleep(2000);
            Clients.AddProgress("Step 1 of 5 has completed.");
            System.Threading.Thread.Sleep(2000);
            Clients.AddProgress("Step 2 of 5 has completed.");
            System.Threading.Thread.Sleep(3000);
            Clients.AddProgress("Step 3  of 5 has completed.");
            System.Threading.Thread.Sleep(1000);
            Clients.AddProgress("Step 4 of 5 has completed.");
            System.Threading.Thread.Sleep(4000);
            Clients.AddProgress("Step 5 of 5 has completed.",true);
        }
    }
We have just used Sleep method of thread to simulate long running process. Here Clients is a dynamic property of Hub which represents all clients connected to the Hub. And AddProgress is a dynamic expression that will get invoked by the server. And a JavaScript method with exactly same name should be present in the client side.

Step 3-
Now to call this we have to take the reference of the appropriate JavaScript files and this are-
    <script src="Scripts/jquery-1.6.4.js" type="text/javascript"></script>
    <script src="Scripts/jquery.signalR-0.5.3.js" type="text/javascript"></script>
    <script src="signalr/hubs" type="text/javascript"></script>
Now we will have the following HTML-
    <div class="prgressBar" style="width:300px; padding-top:32px">
        <div class="bar" ></div>
    </div>
    <input id="btn" value="start process" type="button" />
In this first di is used to show the progress bar and the second button is used to start the process.

Step 4-
Now we have to do 4 steps to do the sample working-
  1. Create a proxy of the server object.
  2. Add a method with the same name "AddProgress".
  3. Start the hub for listening.
  4. And finally start the complex process from client.
And the code goes like below-
   <script type="text/javascript">
        var img = new Image();
        img.src = "https://cms.unov.org/FullTextSearch/Common/Images/progress.gif";
        $(document).ready(function () {
            var myConnection = $.connection.serverComplexObject;
            myConnection.AddProgress = function (message, completed) {
                $(".prgressBar .bar").html(message);
                if (completed) {
                    $(".prgressBar").removeClass("rotating");
                    $(".prgressBar .bar").html("process completed");
                }
            }
            $("#btn").click(function () {
                $(".prgressBar").addClass("rotating");
                myConnection.complexProcess();
            });
            $.connection.hub.start();
        });
    </script>
Let me list the above steps again
  1. Create a proxy of the server object.(var myConnection = $.connection.serverComplexObject;)
  2. Add a method with the same name "AddProgress".(myConnection.AddProgress = function (message, completed) {)
  3. Start the hub for listening.($.connection.hub.start();)
  4. And finally start the complex process from client.(myConnection.complexProcess();)
Now one thing you can note that serverComplexObject is same as the class name with first letter lowercased. Same is with complexProcess server method. That’s done. You can download the code to see the process in action.