Showing posts with label C#. Show all posts

Friday, July 10, 2020

Purse dynamic JSON with C#

First, let me explain what is we are trying to do in this post. Recently have a problem needed to parse a JSON to a C# object. Few of the fields are fixed whereas few are dynamic in nature. Like in the following JSON-
 
{
  "text": "TestallDay",
  "description": null,
  "recurrenceRule": null,
  "id": 238,
  "recurrenceException": null,
  "allDay": true,
  "startDate": "2020-07-07T05:00:00Z",
  "endDate": "2020-07-08T05:00:00Z",
  "resourceTypeId_52": [
    134
  ],
  "resourceTypeId_49": [
    118,
    124
  ]
}
There can be multiple such properties with resourceTypeId_* where * is a number and these properties contain an array of integers. Here is how we can solve this in one possible way. Declared a class like below-
 
    public class DataModel
    {
        [JsonProperty("text")]
        public string Text { get; set; }

        [JsonProperty("description")]
        public object Description { get; set; }

        [JsonProperty("recurrenceRule")]
        public object RecurrenceRule { get; set; }
        
        [JsonProperty("Id")]
        public int Id { get; set; }
        
        [JsonProperty("recurrenceException")]
        public object RecurrenceException { get; set; }
        
        [JsonProperty("allDay")]
        public bool AllDay { get; set; }
        
        [JsonProperty("startDate")]
        public DateTime StartDate { get; set; }
        
        [JsonProperty("endDate")]
        public DateTime EndDate { get; set; }
       
        [JsonProperty("ResourceTypeIds")]
        public Dictionary<string, int[]> ResourceTypeIds { get; set; }
    }
Here in the class you can see we have a property of type Dictionary where we need to fill in all such properties. We can use normal JSON conversion (in my case used JsonConvert from Newtonsoft) for other properties and we can use Newtonsoft.Json.Linq.JProperty to loop through all such properties - resourceTypeId_34, resourceTypeId_45 etc and fill in the values in integer dictionary. Here is the code-
 
            string json = "{\"text\":\"TestallDay\",\"description\":null,\"recurrenceRule\":null,\"id\":238,\"recurrenceException\":null,\"allDay\":true,\"startDate\":\"2020-07-07T05:00:00Z\",\"endDate\":\"2020-07-08T05:00:00Z\",\"resourceTypeId_52\":[134],\"resourceTypeId_49\":[118,124]}";
            
            var data = JsonConvert.DeserializeObject<DataModel>(json);
            data.ResourceTypeIds = new Dictionary<string, int[]>();
            JObject item = JObject.Parse(json);

            IEnumerable<JProperty> props = item.Properties().Where(p => p.Name.Contains("resourceTypeId"));
            foreach (var prop in props)
            {
                List<int> arrayItems = new List<int>();
                foreach (var arrItem in prop.Value)
                {
                    arrayItems.Add((int)arrItem);
                }
                data.ResourceTypeIds.Add(prop.Name, arrayItems.ToArray());
            }

The output looks like this screenshot-

 
IEnumerable<JProperty> props = item.Properties().Where(p => p.Name.Contains("resourceTypeId"));
            foreach (var (prop, arrayItems) in from prop in props
                                               let arrayItems = (from arrItem in prop.Value
                                                                 select (int)arrItem).ToList()
                                               select (prop, arrayItems))
            {
                data.ResourceTypeIds.Add(prop.Name, arrayItems.ToArray());
            }
Complete source code can be found here

Monday, August 4, 2014

How to upload multiple records in C# and stored procedure without looping

Recently I come across a question regarding how to save multiple records in sql server using C# and without using any loop.

Let’s take a simple case of saving list of persons. Let’s have the following class as person-

public class Person {
        public string PFirstName { get; set; }
        public string PLastName { get; set; }
        public int PAge { get; set; }
    }
Then let’s create a simple data base table called Person as below-
CREATE TABLE [dbo].[Person](
	[FirstName] [varchar](100) NULL,
	[LastName] [varchar](100) NULL,
	[Age] [int] NULL
) ON [PRIMARY] 
Now we can solve this problem by passing XML data as input to a stored procedure and using SQL XML for parsing data and saving to database.

So, let’s first create a list of persons for this example like below-
 List personList =new List(){
                new Person(){ PFirstName="abc", PLastName= "smit", PAge=32},
                new Person(){ PFirstName="bcd", PLastName= "pal", PAge=32}
            };
 
Now let’s parse this list to XML for saving and put it into a string variable-
 string SProc = "dbo.save_person_bulk";
            string ConnectonString = @"Data Source=(local);Initial Catalog=sample;Integrated Security=True;";
            using (SqlConnection sqlConnection = new SqlConnection(ConnectonString))
            {
                sqlConnection.Open();

                using (SqlCommand sqlCommand = new SqlCommand(SProc, sqlConnection))
                {
                    sqlCommand.CommandType = CommandType.StoredProcedure;
                    sqlCommand.Parameters.Add(new SqlParameter("@person_data", SqlDbType.VarChar)
                          {
                              Value = xmlPersonData
                          });
                    using (DataTable dataTable = new DataTable())
                    {
                        using (SqlDataAdapter sqlDataAdapter = new SqlDataAdapter())
                        {
                            sqlDataAdapter.SelectCommand = sqlCommand;
                            sqlDataAdapter.Fill(dataTable);
                        }
                    }
                }
            }
On doing the list parsing the resulting XML will look like this- Looking at the generated XML and the stored procedure the code is self explanatory.

Wednesday, November 7, 2012

Export PDF using jQuery and generic handler in asp.net

Recently I have added a post regarding Export HTML to excel using jQuery and asp.net. Here I am repeating the same for PDF. I will suggest you to go through the previous post as I am not explaining repeating technical aspects.

Let’s directly check the following HTML code-
<html xmlns="http://www.w3.org/1999/xhtml">
<head runat="server">
<script src="http://ajax.aspnetcdn.com/ajax/jQuery/jquery-1.7.js" type="text/javascript"></script>
<script type="text/javascript">
    $(document).ready(function() { 
        $(".expPDF").click(function(){
            var someDummyParameter="test";
            $('body').prepend("<form method='post' action='GetPDF.ashx' style='top:-3333333333px;' id='tempForm'><input type='hidden' name='data' value='" + someDummyParameter + "' ></form>");
            $('#tempForm').submit();
            $("tempForm").remove();
        });
    });
</script>
</head>
<body>
    <form id="form1" runat="server">
    <a href="#" target="_blank" class="expPDF">Export to pdf</a>
    </form>
</body>
</html>
The above code is simple. We are having a simple anchor(a) as a button to lunch the PDF. On the click of the anchor we are creating a form tag on the fly, assigning the action to a generic handler that will create the PDF file. At the end we are submitting the form. On the form submit the form will get posted to generic handler. In this example we are also passing some dummy data as hidden filed which will be accessible in the handler code. Likewise we need some additional information we can pass form elements.

Now let’s define the handler code. In the handler we can create the PDF file using some library like itextsharp or something similar. But in this example we are just reading PDF file from the memory the memory. Code is like this-
<%@ WebHandler Language="C#" Class="GetPDF" %>

using System;
using System.Web;

public class GetPDF : IHttpHandler {
    
    public void ProcessRequest (HttpContext context) {
                
        string inputData = context.Request.Form["data"];
        
        byte[] buffer;
        using (System.IO.FileStream fileStream = new System.IO.FileStream(@"E:\ForumPosts\jQueryPDF\" + inputData + ".pdf", System.IO.FileMode.Open, System.IO.FileAccess.Read, System.IO.FileShare.Read))
        using (System.IO.BinaryReader reader = new System.IO.BinaryReader(fileStream))
        {
            buffer = reader.ReadBytes((int)reader.BaseStream.Length);
        }
        context.Response.ContentType = "application/pdf";
        context.Response.AddHeader("Content-Length", buffer.Length.ToString());
        context.Response.AppendHeader("content-disposition", "inline; filename=test.pdf"); 
        context.Response.BinaryWrite(buffer);
        context.Response.End(); 
    }
 
    public bool IsReusable {
        get {
            return false;
        }
    }

}
As you can see the first line in the handler ProcessRequest function we are accessing the form data passed string inputData = context.Request.Form["data"];. The remaining code is self-explanatory. The PDF file path I have hard coded according to my folder structure.

You can download the code form here.

Tuesday, October 30, 2012

Export HTML to excel using jQuery and asp.net

Here we will see how to export a HTML table content to excel using asp.net web form and C# using jQuery.

Let’s start with a small piece of code –
    <h2>
        Export to excel using jquery
    </h2>

    <a href="#" class="expToExcel">Export to excel</a>
    <div id="toReport">
    <table>
        <tr>
          <th>Name</th>
          <th>Age</th>
          <th>Email</th>
        </tr>
        <tr>
          <td>John</td>
          <td>44</td>
          <td>john@gmail.com</td>
        </tr>
        <tr>
          <td>Rambo</td>
          <td>33</td>
          <td>rambo@gmail.com</td>
        </tr>
        <tr>
          <td>It's hot</td>
          <td>33</td>
          <td>test@hotmail.com</td>
        </tr>
    </table>
    </div>
On click of "Export to excel" let do export the content to excel file using jQuery. We can do this in following steps-
  1. Get the HTML content.
  2. Encode the HTML content.
  3. Pass the HTML encoded content to an aspx page.
  4. Generate the excel file from code behind.
Step 1-
var data = $("#toReport").html();
data = escape(data);
Why we are escaping the HTML data and then passing to code behind. Answer is that we are going to pass the data to an aspx page using a dynamically created form. It is going to through "A potentially dangerous Request.Form value was detected from the client" error. That’s why we are escaping the HTML content.

Step 2-
$('body').prepend("<form method='post' action='exportPage.aspx' style='top:-3333333333px;' id='tempForm'><input type='hidden' name='data' value='" + data + "' ></form>");
$('#tempForm').submit();
$("tempForm").remove();
In this step we are adding an aspx page named exportPage.aspx. And creating a form tag on the fly, add the HTML data to a hidden field and submit the form using jQuery. And finally remove the added form tag.

Step 3 & 4-
        string data = Request.Form["data"];
        data = HttpUtility.UrlDecode(data);
        Response.Clear();
        Response.AddHeader("content-disposition", "attachment;filename=report.xls");
        Response.Charset = "";
        Response.ContentType = "application/excel";
        HttpContext.Current.Response.Write( data );
        HttpContext.Current.Response.Flush();
        HttpContext.Current.Response.End();
In this step we are simply creating the excel file and flushing the result as excel. You may see a message saying corrupt excel file do you want to open the file. You can open the file not an issue. I am too lazy to fine out proper setting.

You can also download the code from here.

Wednesday, October 3, 2012

Progress bar for long running process with steps using asp.net, C#, SignalR

I have come across with many questions regarding implementing progress of some long running operations in asp.net application. And I could not see any way to solve this problem directly in asp.net. Even with ajax call to get what step is running is not possible because once a long process has started, the server cannot listen to an ajax request until the previous step is finished. This is because the processing is done as a single thread.

Thanks to Microsoft for VS 2010 and SignalR.

Here we will try to implement a demo progress of long running application step by step using SignalR and visual studio 2010.

Step 1- Install signal R
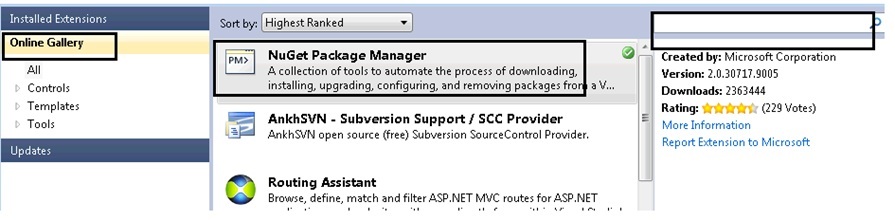
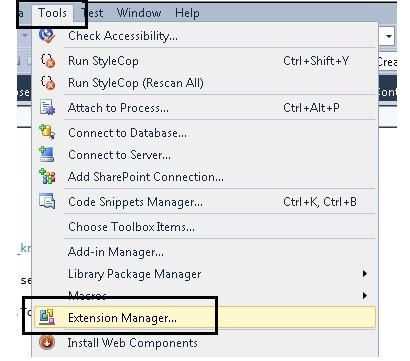
Check whether NuGet package manager is installed with your visual studio. If not go to tool -> Extension manager this will pop up the following window-


Go to online gallery, if you cannot see NuGet Package Manager, then search on the search box on the left side. Install it.

Create a web application with dot net framework 4, and then right click on the project and then click on Manage NuGet Packages… This will pop up the above window again like below-


Go to online then type signalr in the search box. This will list SignalR as the first item. Click on install.

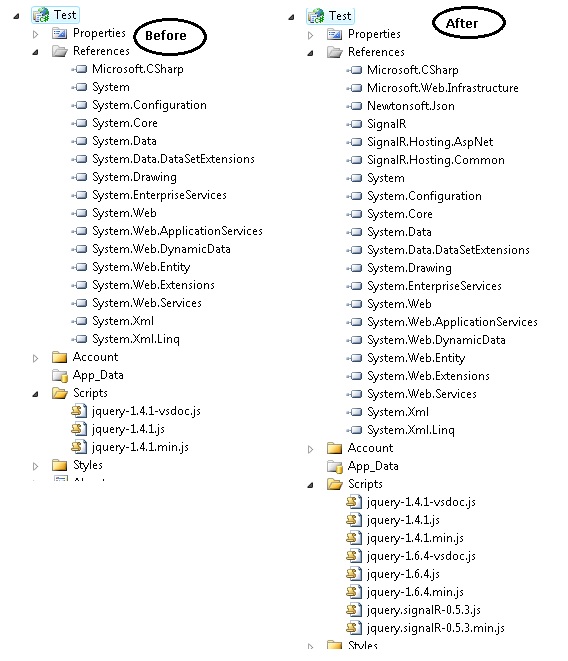
If you note down the reference of your project and the js file you can see the following difference-


Step 2-
First we will create a class named ServerComplexObjectand inherit this from SignalR.Hubs.Hub. And we will add a method named ComplexProcess() like below-
    public class ServerComplexObject:SignalR.Hubs.Hub {
        public void ComplexProcess()
        {
            System.Threading.Thread.Sleep(2000);
            Clients.AddProgress("Step 1 of 5 has completed.");
            System.Threading.Thread.Sleep(2000);
            Clients.AddProgress("Step 2 of 5 has completed.");
            System.Threading.Thread.Sleep(3000);
            Clients.AddProgress("Step 3  of 5 has completed.");
            System.Threading.Thread.Sleep(1000);
            Clients.AddProgress("Step 4 of 5 has completed.");
            System.Threading.Thread.Sleep(4000);
            Clients.AddProgress("Step 5 of 5 has completed.",true);
        }
    }
We have just used Sleep method of thread to simulate long running process. Here Clients is a dynamic property of Hub which represents all clients connected to the Hub. And AddProgress is a dynamic expression that will get invoked by the server. And a JavaScript method with exactly same name should be present in the client side.

Step 3-
Now to call this we have to take the reference of the appropriate JavaScript files and this are-
    <script src="Scripts/jquery-1.6.4.js" type="text/javascript"></script>
    <script src="Scripts/jquery.signalR-0.5.3.js" type="text/javascript"></script>
    <script src="signalr/hubs" type="text/javascript"></script>
Now we will have the following HTML-
    <div class="prgressBar" style="width:300px; padding-top:32px">
        <div class="bar" ></div>
    </div>
    <input id="btn" value="start process" type="button" />
In this first di is used to show the progress bar and the second button is used to start the process.

Step 4-
Now we have to do 4 steps to do the sample working-
  1. Create a proxy of the server object.
  2. Add a method with the same name "AddProgress".
  3. Start the hub for listening.
  4. And finally start the complex process from client.
And the code goes like below-
   <script type="text/javascript">
        var img = new Image();
        img.src = "https://cms.unov.org/FullTextSearch/Common/Images/progress.gif";
        $(document).ready(function () {
            var myConnection = $.connection.serverComplexObject;
            myConnection.AddProgress = function (message, completed) {
                $(".prgressBar .bar").html(message);
                if (completed) {
                    $(".prgressBar").removeClass("rotating");
                    $(".prgressBar .bar").html("process completed");
                }
            }
            $("#btn").click(function () {
                $(".prgressBar").addClass("rotating");
                myConnection.complexProcess();
            });
            $.connection.hub.start();
        });
    </script>
Let me list the above steps again
  1. Create a proxy of the server object.(var myConnection = $.connection.serverComplexObject;)
  2. Add a method with the same name "AddProgress".(myConnection.AddProgress = function (message, completed) {)
  3. Start the hub for listening.($.connection.hub.start();)
  4. And finally start the complex process from client.(myConnection.complexProcess();)
Now one thing you can note that serverComplexObject is same as the class name with first letter lowercased. Same is with complexProcess server method. That’s done. You can download the code to see the process in action.

Wednesday, June 27, 2012

Copy a network (shared folder) file using c#

Recently I came across a requirement to copy a network file (shared folder file) in regular time interval. I tried many options. Finally following approach worked properly.

We can do following-
  1. Login to a user account using c#.
  2. Impersonate as the logged in user.
  3. Copy the file using System.IO.File.Copy.

For step 1 we can login to a user account using LogonUser of advapi32.dll. To consume this method we need to do dll import as follows. We can add the following method in the current class-
[System.Runtime.InteropServices.DllImport("advapi32.dll", SetLastError = true, CharSet = System.Runtime.InteropServices.CharSet.Unicode)]
public static extern bool LogonUser(String lpszUsername, String lpszDomain, String lpszPassword, int dwLogonType, int dwLogonProvider, ref IntPtr phToken);
We can see the detail of the method here-

http://msdn.microsoft.com/en-us/library/windows/desktop/aa378184%28v=vs.85%29.aspx

Next we can call the method like below-
IntPtr tokenHandle = new IntPtr(0);
bool returnValue = LogonUser("usermane", "domain", "password", 2, 0, ref tokenHandle);
if (!returnValue)
throw new Exception("Logon failed.");
For step 2 we can impersonate the logon user by the Impersonate method of WindowsIdentity class as follows-
System.Security.Principal.WindowsImpersonationContext impersonatedUser = null;
System.Security.Principal.WindowsIdentity wid = new System.Security.Principal.WindowsIdentity(tokenHandle);
impersonatedUser = wid.Impersonate();
And finally for step 3 we can copy the file as-
System.IO.File.Copy("SourceFile", "DestinationFile", true);
For source and the destination file either a network file or a local file. We also need to take care of proper access right of the shared folder.

Tuesday, June 12, 2012

Getting started with amazon simple storage service (S3) with dot net

Recently I was getting hard time to work with amazon S3 with C#. I am sharing my experience here. To start with we can create an account in http://aws.amazon.com/. It’s free to create an account here. But we have to pay for the services we want to use. There are many services available. We can choose what we need.

I had a requirement to save a file in the cloud, a json file. And periodically update the file. It’s just a storage need. So we have chosen the S3.

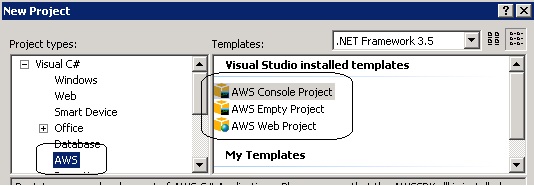
Now before going forward as we are supposed to do the uploading with C#, let’s first download the dot net SDK from http://aws.amazon.com/sdkfornet/ and install the SDK. This installation will give new project templates for working with cloud. After installation there will be following project templates available for development.


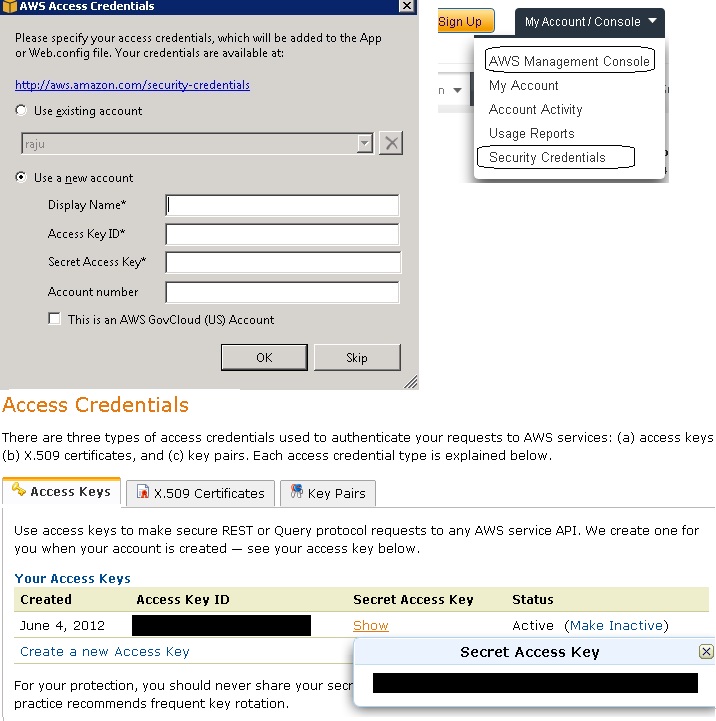
If we choose any of the three project types and create a project we will get a popup asking Display name, Access Key Id, Secret Access Key. To get the keys we can go to own account (click on My Account/Console Link on the top) then go to Security Credentials. If we are able to visit page we will get Access Credentials like in the image below. Here I have blacked out my credentials. We can now fill the credentials and click ok. For the name we can choose any name. VS will save this name for shortcut of the given credentials. If we visit the web config or appconfig we can see the following app keys-
 <appSettings>
  <add key="AWSAccessKey" value="********************"/>
  <add key="AWSSecretKey" value="****************************************"/>
</appSettings>
Also the template will add a dll named AWSSDK.dll to the solution which contains the API library needed to communicate with S3 cloud.

If not able to visit credential page, no need to worry we will get there soon.


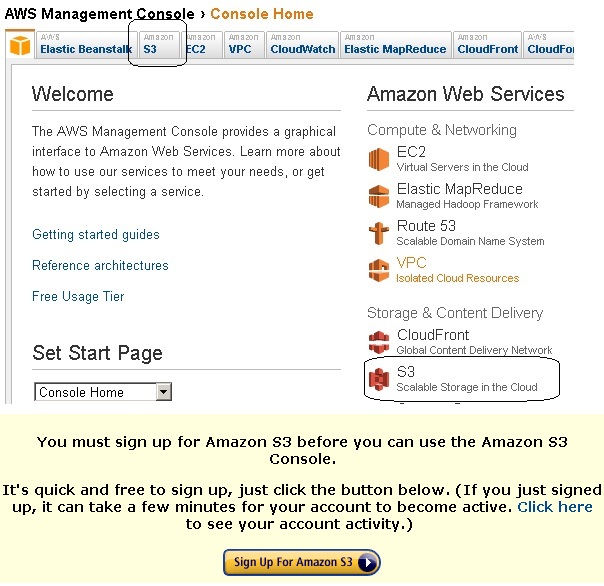
Now we can go to the management console. In the above image we can click AWS Management Console. We will go the console page. From the page we can choose S3. We can find it in two place- top tab and under Amazon Web Services. Both are marked in the image below. If we have created a normal account, we will not be able to do anything. We will get the message in the yellow background as in the image.


To consume this we have to signup (purchase) S3 here. As discussed earlier if we are not able to find the credentials, we will be able to find after purchase.

After we have signed up we can go to the console. And we can see two sections. Left is bucket and right is files and folders. To add any file we need to have a bucket. We can consider a bucket is nothing but a grouping of files and folders. We can group file in different folder hierarchy in the right side. To create a bucket we can chose create bucket button in the left side. We can give a name and select a region. We can create and delete a bucket from C# like this-

Create a bucket:
Amazon.S3.AmazonS3 s3Client = Amazon.AWSClientFactory.CreateAmazonS3Client();
Amazon.S3.Model.PutBucketRequest bucket = new Amazon.S3.Model.PutBucketRequest();
bucket.BucketName = "ag_testbucket";
bucket.BucketRegion = Amazon.S3.Model.S3Region.US;
s3Client.PutBucket(bucket);
What we are doing here is creating an amazon S3 object. And then creating a PutBucketRequest object and using the S3 object we are creating the bucket. Similarly we can delete a bucket using DeleteBucketRequest object like below-

Delete a bucket:
Amazon.S3.AmazonS3 s3Client = Amazon.AWSClientFactory.CreateAmazonS3Client();
Amazon.S3.Model.DeleteBucketRequest bucketDelete=new Amazon.S3.Model.DeleteBucketRequest();
bucketDelete.BucketName = "ag_testbucket";
s3Client.DeleteBucket(bucketDelete);
Create and update a file in cloud:
Amazon.S3.AmazonS3 s3Client = Amazon.AWSClientFactory.CreateAmazonS3Client();
try
{
    string strBucketName="your_bucket_name";
    Amazon.S3.Model.ListBucketsResponse response = s3Client.ListBuckets();
    if (response.Buckets != null && response.Buckets.Where(b=>b.BucketName==strBucketName).Count()>0)
    {
        String strFileName = "test.txt";
        PutObjectRequest request = new PutObjectRequest();
        request.WithBucketName(strBucketName);
        request.WithKey(strFileName);

        //create data and add with the following line

        request.WithContentBody("sone dummy text");

        PutObjectResponse objResponse = s3Client.PutObject(request);
    }
}
catch (AmazonS3Exception ex)
{
}
To create and upload a text file using S3, we need to create an S3 client and then we have to use a bucket to upload the file. By if statement we are checking whether the bucket being used is available or not. And then we are uploading the file in the bucket.

Wednesday, November 18, 2009

Bind ArrayList Text and Value Field to DataList

Description:
Here is the code for binding the text and the value fields of the ArrayList to a DataList in Asp.net using C#.

HTML:
<asp:DataList ID="DataList1" runat="server">
<ItemTemplate>
<%# ((ListItem)Container.DataItem).Text %> ..........<%# ((ListItem)Container.DataItem).Value %>
</ItemTemplate>
</asp:DataList>

Code behind:
ArrayList aa = new ArrayList();
aa.Add(new ListItem("John", "1"));
aa.Add(new ListItem("Smit", "2"));
aa.Add(new ListItem("Bob", "3"));
DataList1.DataSource = aa;
DataList1.DataBind();