Showing posts with label jQuery. Show all posts

Wednesday, November 7, 2012

Export PDF using jQuery and generic handler in asp.net

Recently I have added a post regarding Export HTML to excel using jQuery and asp.net. Here I am repeating the same for PDF. I will suggest you to go through the previous post as I am not explaining repeating technical aspects.

Let’s directly check the following HTML code-
<html xmlns="http://www.w3.org/1999/xhtml">
<head runat="server">
<script src="http://ajax.aspnetcdn.com/ajax/jQuery/jquery-1.7.js" type="text/javascript"></script>
<script type="text/javascript">
    $(document).ready(function() { 
        $(".expPDF").click(function(){
            var someDummyParameter="test";
            $('body').prepend("<form method='post' action='GetPDF.ashx' style='top:-3333333333px;' id='tempForm'><input type='hidden' name='data' value='" + someDummyParameter + "' ></form>");
            $('#tempForm').submit();
            $("tempForm").remove();
        });
    });
</script>
</head>
<body>
    <form id="form1" runat="server">
    <a href="#" target="_blank" class="expPDF">Export to pdf</a>
    </form>
</body>
</html>
The above code is simple. We are having a simple anchor(a) as a button to lunch the PDF. On the click of the anchor we are creating a form tag on the fly, assigning the action to a generic handler that will create the PDF file. At the end we are submitting the form. On the form submit the form will get posted to generic handler. In this example we are also passing some dummy data as hidden filed which will be accessible in the handler code. Likewise we need some additional information we can pass form elements.

Now let’s define the handler code. In the handler we can create the PDF file using some library like itextsharp or something similar. But in this example we are just reading PDF file from the memory the memory. Code is like this-
<%@ WebHandler Language="C#" Class="GetPDF" %>

using System;
using System.Web;

public class GetPDF : IHttpHandler {
    
    public void ProcessRequest (HttpContext context) {
                
        string inputData = context.Request.Form["data"];
        
        byte[] buffer;
        using (System.IO.FileStream fileStream = new System.IO.FileStream(@"E:\ForumPosts\jQueryPDF\" + inputData + ".pdf", System.IO.FileMode.Open, System.IO.FileAccess.Read, System.IO.FileShare.Read))
        using (System.IO.BinaryReader reader = new System.IO.BinaryReader(fileStream))
        {
            buffer = reader.ReadBytes((int)reader.BaseStream.Length);
        }
        context.Response.ContentType = "application/pdf";
        context.Response.AddHeader("Content-Length", buffer.Length.ToString());
        context.Response.AppendHeader("content-disposition", "inline; filename=test.pdf"); 
        context.Response.BinaryWrite(buffer);
        context.Response.End(); 
    }
 
    public bool IsReusable {
        get {
            return false;
        }
    }

}
As you can see the first line in the handler ProcessRequest function we are accessing the form data passed string inputData = context.Request.Form["data"];. The remaining code is self-explanatory. The PDF file path I have hard coded according to my folder structure.

You can download the code form here.

Tuesday, October 30, 2012

Export HTML to excel using jQuery and asp.net

Here we will see how to export a HTML table content to excel using asp.net web form and C# using jQuery.

Let’s start with a small piece of code –
    <h2>
        Export to excel using jquery
    </h2>

    <a href="#" class="expToExcel">Export to excel</a>
    <div id="toReport">
    <table>
        <tr>
          <th>Name</th>
          <th>Age</th>
          <th>Email</th>
        </tr>
        <tr>
          <td>John</td>
          <td>44</td>
          <td>john@gmail.com</td>
        </tr>
        <tr>
          <td>Rambo</td>
          <td>33</td>
          <td>rambo@gmail.com</td>
        </tr>
        <tr>
          <td>It's hot</td>
          <td>33</td>
          <td>test@hotmail.com</td>
        </tr>
    </table>
    </div>
On click of "Export to excel" let do export the content to excel file using jQuery. We can do this in following steps-
  1. Get the HTML content.
  2. Encode the HTML content.
  3. Pass the HTML encoded content to an aspx page.
  4. Generate the excel file from code behind.
Step 1-
var data = $("#toReport").html();
data = escape(data);
Why we are escaping the HTML data and then passing to code behind. Answer is that we are going to pass the data to an aspx page using a dynamically created form. It is going to through "A potentially dangerous Request.Form value was detected from the client" error. That’s why we are escaping the HTML content.

Step 2-
$('body').prepend("<form method='post' action='exportPage.aspx' style='top:-3333333333px;' id='tempForm'><input type='hidden' name='data' value='" + data + "' ></form>");
$('#tempForm').submit();
$("tempForm").remove();
In this step we are adding an aspx page named exportPage.aspx. And creating a form tag on the fly, add the HTML data to a hidden field and submit the form using jQuery. And finally remove the added form tag.

Step 3 & 4-
        string data = Request.Form["data"];
        data = HttpUtility.UrlDecode(data);
        Response.Clear();
        Response.AddHeader("content-disposition", "attachment;filename=report.xls");
        Response.Charset = "";
        Response.ContentType = "application/excel";
        HttpContext.Current.Response.Write( data );
        HttpContext.Current.Response.Flush();
        HttpContext.Current.Response.End();
In this step we are simply creating the excel file and flushing the result as excel. You may see a message saying corrupt excel file do you want to open the file. You can open the file not an issue. I am too lazy to fine out proper setting.

You can also download the code from here.

Sunday, September 2, 2012

Check whether a function is registered or not to an event in JavaScript

This is a small and simple post to check whether a JavaScript function is registered to an event of a DOM element. For this example we will take a button and click event. We will associate two functions and then will check whether one a function is attached or not.

We will do this using getAttribute method of a DOM element to get the value of onclick attribute. Code goes like below-
<html xmlns="http://www.w3.org/1999/xhtml">
<head>
  <script type="text/javascript">
       function handlerFunction1() {
          alert("1");
      }
      function handlerFunction2() {
          alert("2");
      }
      function fn() {
           var functionArray = document.getElementById("test").getAttribute("onclick").split(",");
     for(var i=0; i<functionArray.length; i++)
     {
    if(functionArray[i].indexOf("handlerFunction1()")>=0)
     alert("function fn1() is registered with click me function");
     }
      }

  </script>
<title>
 </title></head>
<body>
    <form method="post" action="about show error message.aspx" id="form1">
    <input onclick="handlerFunction1(), handlerFunction2()" value="click me" type="button" id="test" />
    <a onclick="fn()" href="#">check fn1() is registered with click button</a>
    </form>
</body>
</html>
Now what if the event handlers are added dynamically with addEventListener/attachEvent, in that case the value of document.getElementById("test").getAttribute("onclick") will be null even if there are two functions registered to the event.

That reminds me some attribute or function like eventListenerList. But most of the browser does not support this now. It’s still a recommendation; you can check this here-

http://www.w3.org/TR/2001/WD-DOM-Level-3-Events-20010823/events.html#Events-EventListenerList

But we can implement something like below-
<html xmlns="http://www.w3.org/1999/xhtml">
<head>
  <script type="text/javascript">
       function handlerFunction1() {
          alert("1");
      }
      function handlerFunction2() {
          alert("2");
      }
      function fn() {
           var functionArray = document.getElementById("test").getAttribute("onclick");
     if(functionArray!=null)
    functionArray=functionArray.split(",");
     else
     {
    if(document.getElementById("test").eventListenerList!=null)
    functionArray= document.getElementById("test").eventListenerList["click"];
     }
     
     for(var i=0; i<functionArray.length; i++)
     {
    if(functionArray[i].indexOf("handlerFunction1()")>=0)
     alert("function fn1() is registered with click me function");
     }
      }
   function addEventHandler(elem,eventType,handler) {
  if(elem.eventListenerList==null)
   elem.eventListenerList=new Object();
  if(elem.eventListenerList[eventType]==null)
   elem.eventListenerList[eventType]=new Array();
  elem.eventListenerList[eventType].push(handler);
   if (elem.addEventListener)
    elem.addEventListener (eventType,handler,false);
   else if (elem.attachEvent)
    elem.attachEvent ('on'+eventType,handler); 
   }
   window.onload=function(){
  var btn= document.getElementById("test");
  addEventHandler(btn,"click",handlerFunction1);
  addEventHandler(btn,"click",handlerFunction2);
   }
  </script>
<title>
 </title></head>
<body>
    <form method="post" action="about show error message.aspx" id="form1">
    <input value="click me" type="button" id="test" />
    <a onclick="fn()" href="#">check fn1() is registered with click button</a>
    </form>
</body>
</html>
Following is a running snap shot.

Friday, August 10, 2012

Master-detail with knockout in asp.net MVC 3

In this post we will be discussing creating a master detail relationship with Knockout.js in asp.net MVC 3. For this let’s take a simple view model like below-
    public class PersonViewModel
    {
        public int PersonID { get; set; }
        public string FirstName { get; set; }
        public string LastName { get; set; }
        public string Sex { get; set; }
        public int Age { get; set; }
        public string Address { get; set; }
    }
How we will be starting the problem is that, we will be retrieving a list of person with id, and name only and present the data in a HTML table. And on click of the table row we will be showing detail of the person with the additional information.

If we are not aware of knockout we can here and download and study the it.

For this example we will be using the following controller method to retrieve some in memory data-
public ActionResult Index()
{
    List<PersonViewModel> data = new List<PersonViewModel>();
    for (int i = 0; i < 10; i++)
        data.Add(new PersonViewModel() {PersonID=i, FirstName = "First Name " + i.ToString(), LastName = "Last Name " + i.ToString() });
    return View(data);
}
Next step is to prepare UI for the problem. First we will take the reference of jQuery and knockout file like below-
<script src="@Url.Content("~/Scripts/jquery-1.4.4.min.js")" type="text/javascript"></script>
<script src="http://knockoutjs.com/js/knockout-2.1.0.js" type="text/javascript"></script>
And we will be using the following HTML for displaying the person list and the detail-
<table>
    <tr><th>First Name</th><th>Last Name</th></tr>
    <tbody >
    <tr id="PersonID" style="cursor:pointer" >@*repeat the row to display all the person*@
        <td >First name of the person</td>
        <td >Last name of the person</td>
    </tr>
    </tbody>
</table>
<p data-bind="with: personViewModel.selectedItem">
    <b>Name:</b> <span >First name of the person</span> &nbsp;<span >Last name of the person</span><br />
    <b>Age:</b> <span >Age of the person</span> <br />
    <b>Sex:</b> <span >Sex of the person</span> <br />
    <b>Address:</b> <span >Address of the person</span> <br />
</p>
As you can see that the controller method is returning List<PersonModelView> as the type of the strongly type view, so, we will have the following model directive in the view-
@model List<KnockoutMasterDetail.Models.PersonViewModel>
This will give generic list of Person data. But as per out requirement of knockout we need to convert this list to JavaScript array. We can do this by the following code-
var persons = new Array();
@foreach (var d in Model)
{
    <text>persons.push({PersonID:</text>@d.PersonID<text>, FirstName:"</text>@d.FirstName<text>", LastName:"</text>@d.LastName<text>"});</text>
}
The above code will be inside the script tag in the view. And it’s simply looping the person list and creating an array of person object like {PersonID:1, FirstName:”First Name 1”, LastName:”Last name 1” }. Now we have our person array ready. Next let’s create view model to be used with knockout.
function personModel() {
    var self = this;
    self.persons = ko.observableArray(persons);
    self.selectedItem = ko.observable();
    self.getDetail = function(item) { 
      //to be implemented  
    }
}
personViewModel = new personModel();
In the above JavaScript function, we are adding this line self.persons = ko.observableArray(persons);. What it means is that we are directing the knockout that the persons array is an observable. That mean if there is any change in the array then its corresponding UI will also be changed automatically. For this example, if we do not make the array as observable, it will work as we are not expecting any change in the array. So, we can simply have self.persons = persons;. But we need the next statement, as on clicking a row we need to change the detail. To activate the viewmodel to work with knockout, we need to register the viewmodel. We can do this by the following like-
ko.applyBindings(personViewModel);
Just this registration will not work. We need to make the necessary changes in the HTML.

Now self.persons is an array and we need to make changes in the HTML table to link this array to the HTML table. We can do this by following-
    <tbody data-bind="foreach: personViewModel.persons">
    <tr data-bind="click:personViewModel.getDetail, attr: {id: PersonID}" style="cursor:pointer" >
        <td data-bind="text: FirstName"></td>
        <td data-bind="text: LastName"></td>
    </tr>
    </tbody>
What we are doing here is adding data-bind attribute that is related to knockout. Whenever we will make any change in the array, knockout will use this attribute to make changes back to the UI. In the first line we are using foreach to loop through all the items of the array persons and putting the values of the array item to row. Next line we have click:personViewModel.getDetail, attr: {id: PersonID}. In first part of it we are associating click event of the row to a function in the viewmodel named getDetail. In the second part we are assigning id of the row to PersonID. And in the remaining two lines we are assigning first name and last name to two cells.

Next we need to modify the detail section and we need to associate this to observable selectedItem in the model and we can do this by altering the HTML as below-
<p data-bind="with: personViewModel.selectedItem">
    <b>Name:</b> <span data-bind="text: FirstName"></span> &nbsp;<span data-bind="text: LastName"></span><br />
    <b>Age:</b> <span data-bind="text: Age"></span> <br />
    <b>Sex:</b> <span data-bind="text: Sex"></span> <br />
    <b>Address:</b> <span data-bind="text: Address"></span> <br />
</p>
So, now whenever we will click the row it will call the function getDetail in the model. Currently the function is empty. Let’s first have a controller method that returns the detail of the person like below-
        public JsonResult GetDetail(int personID)
        {
            return Json(new PersonViewModel()
            {
                FirstName = "FirstName " + personID.ToString(),
                LastName = "LastName " + personID.ToString(),
                Sex = "Sex " + personID.ToString(),
                Age = personID,
                Address = "Address " + personID.ToString()
            });
        }
Here we are just building an in memory detail. And we can call the controller method like-
    self.getDetail = function(item) { 
        $.ajax({
            url:  '@Url.Action("GetDetail","Person")',
            data: { personID: item.PersonID },
            type: "POST",
            success: function (response) {
                self.selectedItem(response); 
            },
            error:function(x,y,z){debugger;}
        });
    }
Inside the success method we are getting the result of the ajax call and assigning the result to the selectedItem(self.selectedItem(response);). As it’s an observable, knockout will automatically update the corresponding HTML for detail. That’s all. You can download the source code from this link.

Wednesday, June 13, 2012

Passing extra parameters with dataTable.net plugin while server paging is enabled in asp.net MVC 3 and Web form

Recently I have added two posts to implement dataTable.net jQuery plugin with server side paging with MVC3 and asp.net web form. First one is in MVC 3 and second one is in web form. We can find these two posts here-

http://growingtech.blogspot.in/2012/06/ajax-data-paging-with-datatablesnet.html
http://growingtech.blogspot.in/2012/06/ajax-data-paging-with-datatablesnet_06.html

I will request to study these two posts in sequentially to understand this one.

In this post we will be discussing how to pass additional parameters when page index changes happen in dataTable.net. To pass additional parameters in ajax paging we can use fnServerParams function of dataTable. In the MVC post we have discussed how dataTable plugin adds request parameters as querystring. And this function (fnServerParams) provides an input parameter which is nothing but an array of the query string parameters. We can do modification to the array in the function to accomodiate our need of extra parameters. Each array element in the input array is an object of the following form-
{ "name": "name of parameter/querystring", "value": "value of parameter/querystring " }
So, we can add our additional parameter accordingly. Suppose we have following input data as additional parameter-
First Criteria: <input id="txtParameter1" /><br />
Second Criteria : <input id="txtParameter2" />
We can add the these extra parameter like below-
<script type="text/javascript" charset="utf-8">
    $(document).ready(function () {
        $('#example').dataTable({
            "bServerSide": true,
            "bProcessing": true,
            "sPaginationType": "full_numbers",
            "sAjaxSource": 'Datatable Plugin Pagination Issue AjaxPath.aspx',
            "fnServerParams": function (aoData) {
                aoData.push(
                    { "name": "firstcriteria", "value": $("#txtParameter1").val() },
                    { "name": "secondcriteria", "value": $("#txtParameter2").val() }
                );
            }
        });
    });
</script>
In web form:

In web form we can access these parameters like below and use for database operations –
var firstCriteria = Request.QueryString["firstcriteria"];
var secondCriteria = Request.QueryString["secondcriteria"];
In MVC 3-

To use in MVC 3 we can modify data model like below to accommodate our new parameters-
    public class TableParameter
    {
        public string sEcho { get; set; }
        public int iDisplayStart { get; set; }
        public int iDisplayLength { get; set; }
        public string firstcriteria { get; set; }
        public string secondcriteria { get; set; }
    }
Input data will be available in the controller method to use.

Wednesday, June 6, 2012

jqPlot bar graph with asp.net MVC 3

In this post we will be exploring using jqPlot bar graph with asp.net MVC 3. We can download the plugin for the below location-

http://www.jqplot.com/

To start with let’s see how bar graph works. Following is code for a bar graph with HTML and JavaScript bar data object-
<link class="include" rel="stylesheet" type="text/css" href="@Url.Content("~/scripts/jqplot/css/jquery.jqplot.min.css")" />
<!--[if lt IE 9]><script language="javascript" type="text/javascript" src="@Url.Content("~/scripts/jqplot/excanvas.min.js")"></script><![endif]-->
<script type="text/javascript" src="@Url.Content("~/scripts/jqPlot/jquery.jqplot.min.js")"></script>
@*<script type="text/javascript" src="@Url.Content("~/scripts/jqplot/jqplot.canvasTextRenderer.min.js")"></script>
<script type="text/javascript" src="@Url.Content("~/scripts/jqplot/jqplot.canvasAxisTickRenderer.min.js")"></script>*@
<script type="text/javascript" src="@Url.Content("~/scripts/jqplot/jqplot.categoryAxisRenderer.min.js")"></script>
<script type="text/javascript" src="@Url.Content("~/scripts/jqPlot/jqplot.barRenderer.min.js")"></script>

<div class="example-content">
    <!-- Example scripts go here -->
    <style type="text/css">
        .jqplot-target
        {
            margin: 30px;
        }
        .tooltipCss
        {
            position: absolute;
            background-color: #b2b1ac;
            color: White;
            z-index: 200;
            padding: 5px;
            border-radius: 5px;
            display: none;
        }
    </style>
    <div id="chart2" class="plot" style="width: 760px; height: 360px;">
    </div>
</div>
<script language="javascript" type="text/javascript">
    $(document).ready(function () {
        pop1980 = [4, 5, 3, 6, 5, 4, 2, 5];
        pop1990 = [3, 5, 6, 2, 4, 3, 4, 6];
        pop2000 = [2, 5, 6, 3, 4, 5, 2, 4];
        pop2008 = [5, 3, 4, 2, 6, 5, 2, 4];

        ticks = [5, 6, 7, 8, 9, 10, 11, 12];

        series = [
                  { label: 'r. DMR Published - Singapore' },
                  { label: 's. DMR Published - London' },
                  { label: 't. DMR Published - Houston' },
                  { label: 'u. DMR Published - Global' }
               ];

        plot2 = $.jqplot('chart2', [pop1980, pop1990, pop2000, pop2008], {
            legend: {
                show: true,
                placement: 'outsideGrid'
            },
            seriesDefaults: {
                renderer: $.jqplot.BarRenderer,
                rendererOptions: {
                    barPadding: 5
                }
            },
            series: series,
            axes: {
                xaxis: {
                    renderer: $.jqplot.CategoryAxisRenderer,
                    ticks: ticks
//                    ,
//                    tickRenderer: $.jqplot.CanvasAxisTickRenderer,
//                    tickOptions: {
//                        angle: -15
//                    }
                }
            }
        });
        $('#chart2').bind('jqplotDataMouseOver',
            function (ev, seriesIndex, pointIndex, data) {
                $('#info2').html('series "' + series[seriesIndex].label + '" point "' + (pointIndex + 5) + '"<br /> value "' + data[1] + '"');
                $('#info2').css({ "left": ev.pageX + 3, "top": ev.pageY })
                $('#info2').show();
            }
        );
        $('#chart2').bind('jqplotDataUnhighlight',
            function (ev) {
                $('#info2').hide();
            }
        );
    });
</script>
<div id="info2" class="tooltipCss">
</div>
If you check the file references, you can check a file named excanvas.min.js. This is the file for internet explorer less than 9. As the bar is rendered in canvas, a HTML 5 feature, which is not supported in lower versions of IE. All other files are required for bar graph. If you notice, you can see there are two files that are commented out (jqplot.canvasTextRenderer.min.js and jqplot.canvasAxisTickRenderer.min.js ). These two files are needed if you want to rotate the tick texts in both the axis. In the bar initialization you can find the corresponding tickRenderer code is commented out for x-axis. Div with id chart2 is used to hold the bar graph. And div with id info2 is used to hold tooltip content. Input to the graph is array of arrays where each inner array represents data for each bar.

Number of items in each inner array is same. Other than this array there are two more arrays used. One is ticks, this is used to represent the data interval in x- axis. And another is series, this array is used to represent the name of each bar. The order of the series item should be same as the order of the data input arrays.

There are many options used in the plugin. Detail of various options can be found here-

http://www.jqplot.com/docs/files/jqPlotOptions-txt.html
http://www.jqplot.com/docs/files/optionsTutorial-txt.html

We can use as many options required in this case.

Other than these we are using two more events in the plugin named 'jqplotDataMouseOver' and 'jqplotDataUnhighlight'. We are using these events to track tooltips in each bar. We can add debugger and check what is happening.

Model driven Bar Graph:

To make the graph model driven we can have the following model-
namespace Bar.Models
{
    public class BarViewModel
    {
        public int Id { get; set; }
        public string BarName { get; set; }
        public int[] Values { get; set; }
    }
    public class BarDataViewModel
    {
        public int[] TickValues { get; set; }
        public List<BarViewModel> Data { get; set; }
    }
}
And in the controller action we are creating the data in memory as –
        public ActionResult ModelDrivenBar()
        {
            BarDataViewModel data = new BarDataViewModel();
            data.Data = new List<BarViewModel>();
            BarViewModel bar;
            Random r=new Random();
            for (int i = 0; i < 4; i++)
            {
                bar = new BarViewModel();
                bar.Id = i;
                bar.BarName = "Bar Name " + i.ToString();
                bar.Values = new int[10];
                for (int j = 0; j < 10; j++)
                    bar.Values[j] = r.Next(2, 6);
                data.Data.Add(bar);
            }
            data.TickValues = new int[10];
            for (int i = 5; i < 15; i++)
                data.TickValues[i - 5] = i;
            return View(data);
        }
We need to do two changes in the view to accommodate the changes. First add the following line at the starting of the view-
@model Bar.Models.BarDataViewModel
And secondly generate the three arrays, as we have discussed earlier, like below-
        var data = new Array();
        var ticks = new Array();
        var series = new Array();
        @foreach (var d in Model.TickValues)
        {
            <text>ticks.push(</text>@d<text>);</text>
        }
        @foreach (var d in Model.Data)
        {
            <text>var bar</text>@d.Id<text>= new Array();</text>
            <text>series.push({label : "</text>@d.BarName<text>"});</text>
            foreach (var darray in d.Values)
            { 
                <text>bar</text>@d.Id<text>.push(</text>@darray<text>);</text>
            }
            <text>data.push(bar</text>@d.Id<text>);</text>
        }
        plot2 = $.jqplot('chart2', data, {
Instead of explaining the code above, we can check the output of the code below-
        var data = new Array();
        var ticks = new Array();
        var series = new Array();
            ticks.push(5);
            ticks.push(6);
            ticks.push(7);
            ticks.push(8);
            ticks.push(9);
            ticks.push(10);
            ticks.push(11);
            ticks.push(12);
            ticks.push(13);
            ticks.push(14);
            var bar0= new Array();
            series.push({label : "Bar Name 0"});
                bar0.push(2);
                bar0.push(4);
                bar0.push(5);
                bar0.push(5);
                bar0.push(4);
                bar0.push(3);
                bar0.push(2);
                bar0.push(2);
                bar0.push(3);
                bar0.push(5);
            data.push(bar0);
            var bar1= new Array();
            series.push({label : "Bar Name 1"});
                bar1.push(4);
                bar1.push(2);
                bar1.push(2);
                bar1.push(5);
                bar1.push(2);
                bar1.push(3);
                bar1.push(4);
                bar1.push(5);
                bar1.push(5);
                bar1.push(2);
            data.push(bar1);
            var bar2= new Array();
            series.push({label : "Bar Name 2"});
                bar2.push(4);
                bar2.push(3);
                bar2.push(3);
                bar2.push(4);
                bar2.push(2);
                bar2.push(2);
                bar2.push(2);
                bar2.push(3);
                bar2.push(4);
                bar2.push(5);
            data.push(bar2);
            var bar3= new Array();
            series.push({label : "Bar Name 3"});
                bar3.push(5);
                bar3.push(4);
                bar3.push(5);
                bar3.push(2);
                bar3.push(4);
                bar3.push(3);
                bar3.push(5);
                bar3.push(4);
                bar3.push(3);
                bar3.push(5);
            data.push(bar3);
        plot2 = $.jqplot('chart2', data, {
What we are doing here is just creating the bar data dynamically by looping the model data.

Ajax Bar Graph:

To make it ajax driven we can simply change the controller return type like below-
        public JsonResult AjaxBarData()
        {
            //same code like earlier
            return Json(data,JsonRequestBehavior.AllowGet);
        }
And we can do an ajax call to the controller and in the success of the ajax call we can initialize the graph-
<script type="text/javascript">
    $(document).ready(function () {
        $.ajax({
            type: "get",
            timeout: 30000,
            url: '@Url.Action("AjaxBarData")',
            dataType: "json",
            contentType: "application/json; charset=utf-8",
            success: function (result) {
                var data = new Array();
                var ticks = new Array();
                var series = new Array();
                $(result.TickValues).each(function (i, itm) {
                    ticks.push(itm);
                });
                $(result.Data).each(function (i, itm) {
                    series.push({ label: itm.BarName });
                    data[i] = new Array();
                    $(itm.Values).each(function (j, item) {
                        data[i].push(item);
                    });
                });
  //initialize the bar graph here
                plot2 = $.jqplot('chart2', data, {
            },
            error: function (req, status, error) {
                debugger;
            }
        });
    });
</script>
That’s all. You can download the bar code here.

Ajax data paging with dataTables.net jQuery plugin in asp.net web form

I have recently added a post on calling ajax data to dataTables.net jQuery plugin with asp.net MVC 3. You can refer the following post-

http://growingtech.blogspot.in/2012/06/ajax-data-paging-with-datatablesnet.html

I will suggest to study the above post before proceeding this post. But the approach does not work with web form. So, how to do it with web form. As per my knowledge ajax paging with dataTable.net does not work properly with pagemethod or web service. We can solve this with an aspx page directly. But please take care of the security constraints as per your requirement.

First add a aspx page separate from your previous page. And change the sAjaxSource of the dataTable plugin like-
"sAjaxSource": 'Datatable Plugin Pagination Issue AjaxPath.aspx'
And in page load of the page use the following code-
public partial class Datatable_Plugin_Pagination_Issue_AjaxPath : System.Web.UI.Page
{
    protected void Page_Load(object sender, EventArgs e)
    {
        var data = new[]{   
                new []{"Trident test","Internet Explorer 4.0","Win 95+","4","X"},
                new []{"Trident","Internet Explorer 5.0","Win 95+","5","C"},
                new []{"Trident","Internet Explorer 5.5","Win 95+","5.5","A"},
                new []{"Trident","Internet Explorer 6","Win 98+","6","A"},
                new []{"Trident","Internet Explorer 7","Win XP SP2+","7","A"},
                new []{"Trident","AOL browser (AOL desktop)","Win XP","6","A"},
                new []{"Gecko","Firefox 1.0","Win 98+ / OSX.2+","1.7","A"},
                .
                .
                .
                .
                new []{"Other browsers","All others","-","-","U"}
            };
        var pagedData = data.Skip(int.Parse(Request.QueryString["iDisplayStart"])).Take(int.Parse(Request.QueryString["iDisplayLength"]));
        System.Web.Script.Serialization.JavaScriptSerializer toJSON = new System.Web.Script.Serialization.JavaScriptSerializer();
        Response.Clear();
        string dataString = toJSON.Serialize(new
        {
            sEcho = Request.QueryString["sEcho"],
            iTotalRecords = data.Count(),
            iTotalDisplayRecords = data.Count(),
            aaData = pagedData
        });
        Response.Write(dataString);
        Response.End();
    }
}
That's all. Problem solved.

Sunday, June 3, 2012

Ajax data paging with dataTables.net jQuery plugin in asp.net MVC 3

In this post we will be discussing how to do ajax based server side data paging with dataTables.net jQuery plugin in asp.net MVC 3. To continue this lets check following post –

http://datatables.net/examples/data_sources/ajax.html

This is a basic way to access ajax data paging. In this sample all the data needed is retrieved and paging is done in browser memory. But we need more sophisticated approach. That is separate ajax call for each page index change. We can follow the following post for this-

http://datatables.net/examples/data_sources/server_side.html

This is a PHP based code. Let’s do in MVC. Before starting, let’s do some background study on the same.

First case: Let’s see the request on the IE developer tool network tab. If we visit request header and request value we can get data like below-

/examples/examples_support/server_processing.php?sEcho=1&iColumns=5&sColumns=&iDisplayStart=0&iDisplayLength=10&mDataProp_0=0&mDataProp_1=1&mDataProp_2=2&…………….. The bolded text query strings are the required ones. The additional query string can be used are we need but these are out of scope for the current sample.

Second case: Now let’s go to the Response Body. We can get the result like below-

{"sEcho": 1, "iTotalRecords": 57, "iTotalDisplayRecords": 57, "aaData": [ ["Gecko","Firefox 1.0","Win 98+ / OSX.2+","1.7","A"],["Gecko","Firefox 1.5","Win 98+ / OSX.2+","1.8","A"],["Gecko","Firefox 2.0","Win 98+ / OSX.2+","1.8","A"],["Gecko","Firefox 3.0","Win 2k+ / OSX.3+","1.9","A"],["Gecko","Camino 1.0","OSX.2+","1.8","A"],["Gecko","Camino 1.5","OSX.3+","1.8","A"],["Gecko","Netscape 7.2","Win 95+ / Mac OS 8.6-9.2","1.7","A"],["Gecko","Netscape Browser 8","Win 98SE+","1.7","A"],["Gecko","Netscape Navigator 9","Win 98+ / OSX.2+","1.8","A"],["Gecko","Mozilla 1.0","Win 95+ / OSX.1+","1","A"]] }

Here we can see that it returning the sEcho, iTotalRecords, iTotalDisplayRecords, aaData where first three values are integer type and last one is the array of data rows. We can visualize this in the image below-


Now if we think this in terms of MVC model binding things will get clear. We can use a model data class that except the required input parameters and return a JSON result of the desired format. Lets start with the source code-

ViewModel-
    public class TableParameter
    {
        public string sEcho { get; set; }
        public int iDisplayStart { get; set; }
        public int iDisplayLength { get; set; }
    }
In case of the parameter we are using only three here as explained in the first case. We can use other parameters as per our need.

View-
@{
    ViewBag.Title = "Pagination_With_Data_Table_issue";
    Layout = "~/Views/Shared/_Layout.cshtml";
}
<h2>
    Pagination_With_Data_Table_issue</h2>
    
<style type="text/css" title="currentStyle">
   @@import "http://datatables.net/release-datatables/media/css/demo_page.css";
   @@import "http://datatables.net/release-datatables/media/css/demo_table.css";
  </style>
<script type="text/javascript" language="javascript" src="http://datatables.net/release-datatables/media/js/jquery.js"></script>
<script type="text/javascript" language="javascript" src="http://datatables.net/release-datatables/media/js/jquery.dataTables.js"></script>
<script type="text/javascript" charset="utf-8">
    $(document).ready(function () {
        $('#example').dataTable({
            "bServerSide": true,
            "bProcessing": true,
            "sPaginationType": "full_numbers",
            "sAjaxSource": '@Url.Action("Pagination_With_Data_Table_issue_getData")'
        });
    });
</script>
<div id="dynamic">
<table cellpadding="0" cellspacing="0" border="0" class="display" id="example">
 <thead>
  <tr>
   <th width="20%">Rendering engine</th>
   <th width="25%">Browser</th>
   <th width="25%">Platform(s)</th>
   <th width="15%">Engine version</th>
   <th width="15%">CSS grade</th>
  </tr>
 </thead>
 <tbody>
 </tbody>
 <tfoot>
  <tr>
   <th>Rendering engine</th>
   <th>Browser</th>
   <th>Platform(s)</th>
   <th>Engine version</th>
   <th>CSS grade</th>
  </tr>
 </tfoot>
</table>
</div>
While initialization of the table plugin, we are using bServerSide and bProcessing to true, sPaginationType to full_number and finally sAjaxSource to controller action.

Controller action-
        public ActionResult Pagination_With_Data_Table_issue()
        {
            return View();
        }

        public ActionResult Pagination_With_Data_Table_issue_getData(TableParameter param)
        {
            var data = new[]{   
                new []{"Trident test","Internet Explorer 4.0","Win 95+","4","X"},
             new []{"Trident","Internet Explorer 5.0","Win 95+","5","C"},
             new []{"Trident","Internet Explorer 5.5","Win 95+","5.5","A"},
             new []{"Trident","Internet Explorer 6","Win 98+","6","A"},
             new []{"Trident","Internet Explorer 7","Win XP SP2+","7","A"},
             new []{"Trident","AOL browser (AOL desktop)","Win XP","6","A"},
             new []{"Gecko","Firefox 1.0","Win 98+ / OSX.2+","1.7","A"},
             new []{"Gecko","Firefox 1.5","Win 98+ / OSX.2+","1.8","A"},
             new []{"Gecko","Firefox 2.0","Win 98+ / OSX.2+","1.8","A"},
             .
                .
                .
                .
                .
            };

            var pagedData = data.Skip(param.iDisplayStart).Take(param.iDisplayLength);

            return Json(new
            {
                sEcho = param.sEcho,
                iTotalRecords = data.Count(),
                iTotalDisplayRecords = data.Count(),
                aaData = pagedData
            }, JsonRequestBehavior.AllowGet);
        }
In this case we are using the input parameter for filtering the correct data. Finally the return JSON matches the format explained in the second case. The array of data we have prepared form the following link-

http://datatables.net/examples/examples_support/json_source.txt

This explains everything. Let me know for any query. You can download the code here.

Thursday, May 17, 2012

Calculating row total, column total, grand total if a table or gridview using jQuery

In this post lets discuss a very common problem. I have answered many such posts. Finally I decided to write a blog post on it. This is regarding calculating the total of the columns, total of the rows and grand total in a table. For this case lets take textbox in each cell and on keyup we are going to do the calculation. And the code goes here-
<html xmlns="http://www.w3.org/1999/xhtml">
<head runat="server">
    <script src="http://ajax.aspnetcdn.com/ajax/jQuery/jquery-1.7.js" type="text/javascript"></script>
    <script type="text/javascript">
        $(document).ready(function () {
            $(".data").keyup(function () {
                var temp, total = 0, index;
                $(this).closest("tr").find(".data").each(function (i, item) {
                    temp = parseFloat($(item).val());
                    if (!isNaN(temp))
                        total = total + temp;
                });
                $(this).closest("tr").find(".rowTotal").val(total);
                total = 0;
                index = $(this).closest("tr").find("td").index($(this).closest("td"));
                $("#tbl tr").each(function (i, item) {

                    if ($(item).find("td:eq(" + index + ") .data").hasClass("data")) {
                        temp = parseFloat($(item).find("td:eq(" + index + ") .data").val());
                        if (!isNaN(temp))
                            total = total + temp;
                    }
                });
                $("#tbl tr:last td:eq(" + index + ") .columnTotal").val(total);
                calculateGrandTotal();
            })
        });
        function calculateGrandTotal() {
            (function () {
                var temp, total = 0;
                $(".columnTotal").each(function () {
                    temp = parseFloat($(this).val());
                    if (!isNaN(temp))
                        total = total + temp;
                });
                $(".grandTotal").val(total);
            })();
        }
    </script>
</head>
<body>
    <form id="form1" runat="server">
    <table id="tbl">
    <tr>
        <td><asp:TextBox ID="TextBox1" CssClass="data" runat="server"></asp:TextBox></td>
        <td><asp:TextBox ID="TextBox2" CssClass="data" runat="server"></asp:TextBox></td>
        <td><asp:TextBox ID="TextBox3" CssClass="data" runat="server"></asp:TextBox></td>
        <td><asp:TextBox ID="TextBox4" CssClass="data" runat="server"></asp:TextBox></td>
        <td><asp:TextBox ID="TextBox5" CssClass="rowTotal" ReadOnly="true" runat="server"></asp:TextBox></td>
    </tr>
        <tr>
        <td><asp:TextBox ID="TextBox6" CssClass="data" runat="server"></asp:TextBox></td>
        <td><asp:TextBox ID="TextBox7" CssClass="data" runat="server"></asp:TextBox></td>
        <td><asp:TextBox ID="TextBox8" CssClass="data" runat="server"></asp:TextBox></td>
        <td><asp:TextBox ID="TextBox9" CssClass="data" runat="server"></asp:TextBox></td>
        <td><asp:TextBox ID="TextBox10" CssClass="rowTotal" ReadOnly="true" runat="server"></asp:TextBox></td>
    </tr>
        <tr>
        <td><asp:TextBox ID="TextBox11" CssClass="data" runat="server"></asp:TextBox></td>
        <td><asp:TextBox ID="TextBox12" CssClass="data" runat="server"></asp:TextBox></td>
        <td><asp:TextBox ID="TextBox13" CssClass="data" runat="server"></asp:TextBox></td>
        <td><asp:TextBox ID="TextBox14" CssClass="data" runat="server"></asp:TextBox></td>
        <td><asp:TextBox ID="TextBox15" CssClass="rowTotal" ReadOnly="true" runat="server"></asp:TextBox></td>
    </tr>
        <tr>
        <td><asp:TextBox ID="TextBox16" CssClass="data" runat="server"></asp:TextBox></td>
        <td><asp:TextBox ID="TextBox17" CssClass="data" runat="server"></asp:TextBox></td>
        <td><asp:TextBox ID="TextBox18" CssClass="data" runat="server"></asp:TextBox></td>
        <td><asp:TextBox ID="TextBox19" CssClass="data" runat="server"></asp:TextBox></td>
        <td><asp:TextBox ID="TextBox20" CssClass="rowTotal" ReadOnly="true" runat="server"></asp:TextBox></td>
    </tr>
        <tr>
        <td><asp:TextBox ID="TextBox21" CssClass="columnTotal" ReadOnly="true" runat="server"></asp:TextBox></td>
        <td><asp:TextBox ID="TextBox22" CssClass="columnTotal" ReadOnly="true" runat="server"></asp:TextBox></td>
        <td><asp:TextBox ID="TextBox23" CssClass="columnTotal" ReadOnly="true" runat="server"></asp:TextBox></td>
        <td><asp:TextBox ID="TextBox24" CssClass="columnTotal" ReadOnly="true" runat="server"></asp:TextBox></td>
        <td><asp:TextBox ID="TextBox25" CssClass="grandTotal" ReadOnly="true" runat="server"></asp:TextBox></td>
    </tr>
    </table>
    </form>
    </body>
</html>

Sunday, May 13, 2012

Change asp.net checkbox text using checkbox id in JavaScript

Lets first check how a check box is getting rendered in asp.net page. Lets have the following HTML-
<asp:CheckBox ID="chkAll" runat="server" Text="All" />
The above control is getting rendered like-
<input id="ContentPlaceHolder1_chkAll" type="checkbox" name="ctl00$ContentPlaceHolder1$chkAll" />
<label for="ContentPlaceHolder1_chkAll">All</label>
Now to change the text for the check box is nothing but changing the innerHTML of the rendered label. We can do this change by-
<script type="text/javascript">
    function changeLabel(checkboxID, text) {
    debugger;
        var allLabel = document.getElementsByTagName("label");
        for (i = 0; i < allLabel.length; i++) {
            
            if (allLabel[i].htmlFor == checkboxID) {
                allLabel[i].innerHTML = text;
                break;
            }
        }
    }
    changeLabel('<%=chkAll.ClientID %>', "new text");
</script> 
Using jQuery it much more simple-
$("label[for=<%=chkAll.ClientID %>]").html(new text);

Wednesday, May 2, 2012

jQuery datepicker problem with control generated in loop in asp.net MVC

Today I have faced a unique problem with datepicker while working in asp.net MVC.

I have added some textboxes using HTML.TextBoxFor inside a loop and then implemented datepicker on the textboxes. Part of the code goes like this-
<script src="http://ajax.aspnetcdn.com/ajax/jQuery/jquery-1.7.js" type="text/javascript"></script>
<script src="http://ajax.aspnetcdn.com/ajax/jquery.ui/1.8.9/jquery-ui.js" type="text/javascript"></script>
<link href="http://ajax.aspnetcdn.com/ajax/jquery.ui/1.8.9/themes/redmond/jquery-ui.css" rel="stylesheet" type="text/css" />
<script type="text/javascript">
    $(document).ready(function () {
        $("input[id*=DateTaken]").datepicker({
            dateFormat: "dd/mm/yy",
            changeMonth: true,
            changeYear: true
        });
    });
</script>

@for (int i = 0; i < 10; i++)
{
    @Html.TextBoxFor(m=> m.EventDate)
}
Now problem is that datepicker is enabled in all the textboxes, but on selection of date from the picker its adding the selected date to the first text box only. On digging further I can see the textboxes HTML got generated like below-
<input id="DateTaken" name="EventDate" type="text" value="" />
.
.
.
That is control got generated with same id and name 10 times. This is not a valid HTML. But suppose we need the control to be generated like this. Such control collection will be posted as an array with the name EventDate to the controller.

This can be solved very easily. Just generating different ID for each input control. That is the following code change will solve the problem-
@Html.TextBoxFor(m=> m.EventDate, new { @id = "DateTaken"+item.ToString() })

Tuesday, April 3, 2012

Search and highlight using jQuery

In this post we will quickly see the search and highlight functionality using jQuery. For this we are taking a textbox and a table with two columns. Each column contains some dummy numbers. Goal is, while typing a number in the textbox, we will highlight the containing cell values of the table. Implementation is very simple. We are doing the following steps for this-
  1. Add a CSS class called highlight with some CSS in it for highlighting.
  2. Implement the keyup event for the textbox.
  3. In the keyup get the value of the text box.
  4. Remove any existing highlight class attached to table cell.
  5. Get matching cells of the table cell containing the value of the textbox.
  6. Add highlight class to the matching cells.
Complete source code goes here-
<html xmlns="http://www.w3.org/1999/xhtml">
<head runat="server">
    <style>
    .highlight{background-color:Yellow}
    </style>
    <script src="http://ajax.aspnetcdn.com/ajax/jQuery/jquery-1.7.js" type="text/javascript"></script>
    <script type="text/javascript">
        $(document).ready(function () {
            $("#BtnFindMobile").click(function () {
                value = $("#txtSearchMobile").val();
                $("#table td").removeClass("highlight");
                $("#table td:contains(" + value + ")").addClass("highlight");
                return false;
            });
        });
    </script>
</head>
<body>
    <form id="form1" runat="server">
    <asp:TextBox ID="txtSearchMobile" runat="server"></asp:TextBox>
    <table id="table">
    <tr><td>578563495</td><td>5785642345</td></tr>
    <tr><td>5436436</td><td>875768</td></tr>
    <tr><td>578563495</td><td>789789</td></tr>
    <tr><td>578563495</td><td>0789078907890</td></tr>
    <tr><td>5235</td><td>5345345</td></tr>
    <tr><td>57864634563495</td><td>687687687</td></tr>
    <tr><td>77457567</td><td>68763876767</td></tr>
    <tr><td>768768</td><td>5785687687645</td></tr>
    <tr><td>8997896</td><td>68767367687</td></tr>
    <tr><td>80</td><td>358787965423</td></tr>
    <tr><td>64563456</td><td>7474574</td></tr>
    <tr><td>7567456</td><td>5785642345</td></tr>
    <tr><td>7845745746</td><td>9769</td></tr>
    <tr><td>775567574579</td><td>976967979</td></tr>
    </table>
    </form>
</body>
</html>

Monday, April 2, 2012

Dynamic database driven jQuery Tabs in asp.net

In this post we will go through database driven, dynamic jQuery Tabs implementation. To start with lets first check how the tabs HTML looks like.

The basic structure of the HTML that is needed for Tabs implementation looks like this-
<div id="tabs">
   <ul>
      <li><a href="#tabs-1">Nunc tincidunt</a></li>
      <li><a href="#tabs-2">Proin dolor</a></li>
      <li><a href="#tabs-3">Aenean lacinia</a></li>
   </ul>
   <div id="tabs-1">
      <p>Tab 1 content</p>
   </div>
   <div id="tabs-2">
      <p>Tab 2 content</p>
   </div>
   <div id="tabs-3">
      <p>Tab 3 content</p>
   </div>
</div>
Now to implement a data base driven or a dynamic tab, we need to find some repeated sequences of content. If we analyze the HTML structure above, we can see two repeated sequences. First is the UL LI with anchor. Each LI is nothing but a repeat of the other. Only difference is the content of the anchor and the href. Secondly, the repeated sequence is the divs below UL. Only difference is the id and content of the div. So, here is another repeated sequence. So to make dynamic or database driven Tabs we, need to make the tow sets of repetitions.

Now here is a implementation using asp.net repeater control-

http://forums.asp.net/p/1693184/4474572.aspx/1?Re+how+to+interact+this+jquery+with+asp+net+codes+

In this link I am little lazy to write the database code. So I have taken the help of in memory datasource. This can be easily changed and the content can be made database driven and its left up to you. If you notice, the connection between the tab item and the content item is done through ListID. In the anchor href we have the following code href="#fragment-<%#Eval("ListID") %>". And in the div id we have id="fragment-<%#Eval("ListID") %>".

We can see another post below-

http://forums.asp.net/p/1663415/4345867.aspx/1?Re+Tabs+creation+using+Jquery+at+runtime

In this post I have created using jQuery and an array rendered to the page using ClientScript.RegisterClientScriptBlock. This also we can make database driven. We can also get the content of the Tabs using jQuery ajax and asp.net pagemethod or webmethod.

Thursday, March 22, 2012

Full calendar - saving event using ajax / pagemethod/ webmethod in asp.net

In this post we will be saving the event in a full calendar plugin using jQuery ajax and asp.net pagemethod or web service. To go through the post I request you to first check the following post. We are going the proceed forward with the same post and its source code.

http://growingtech.blogspot.in/2012/02/full-calendar-with-json-data-source.html

In addition to the previous script and CSS file references, we have added one more script file for this purpose-
<script src="https://github.com/douglascrockford/JSON-js/raw/master/json2.js" type="text/javascript"></script>
This file is used hare to to JSON stringify the event object.

Now how we are going to solve this issue is that on click of a day, we are going popup an entry form for the event and we will use ajax to save the event to the server and after successful saving we will be adding the event to the calender. Now calender plugin has some event to solve this purpose-
  1. dayClick - this event happen during the mouse click of a day.
  2. renderEvent - using this event we can add an event to the calender. We can set stick to true to permanently add the event to the calender.
For popup we are going to use jQuery dialog. For adding the event we can add the following HTML-
<div id="eventToAdd" style="display: none; font-size: 12px;">
    Event name:
    <input id="eventName" type="text" /><br />
    Event start date:
    <input id="eventStartDate" type="text" />(MM-dd-yyyy)<br />
    Event end date:
    <input id="eventEndDate" type="text" />(MM-dd-yyyy)<br />
</div>
Now we need to show popup dialog for adding event on the day click of the calendar day. To do so we will take the help of the dayClick event of the calender and it goes here-
<script type="text/javascript">
    $('div[id*=fullcal]').fullCalendar({
        dayClick: function (dateSelected, allDay, jsEvent, view) {
            $("#eventToAdd").dialog(
            {
                title: "Add event",
                modal: true,
                buttons: {
                    "Add": function () {
                       //event adding logic goes here                 
                    }
                }
            });
        }
    });
</script>
Now on click of add button in the dialog we need to do two things. First save the event data using jQuery ajax and page method / web service. And secondly on the success of the ajax call add the event on the calender. Both the work is done here-
"Add": function () {
    var event = new Object(), eventToSave = new Object(); ;
    eventToSave.EventID = event.id = Math.floor(200 * Math.random());
    event.start = new Date($("#eventToAdd #eventStartDate").val());
    eventToSave.StartDate = $("#eventToAdd #eventStartDate").val();
    if ($("#eventToAdd #eventEndDate").val() == "") {
        event.end = event.start;
        eventToSave.EndDate = eventToSave.StartDate;
    }
    else {
        event.end = new Date($("#eventToAdd #eventEndDate").val());
        eventToSave.EndDate = $("#eventToAdd #eventEndDate").val();
    }
    eventToSave.EventName = event.title = $("#eventToAdd #eventName").val();

    $("#eventToAdd input").val("");
    $.ajax({
        type: "POST",
        contentType: "application/json",
        data: "{eventdata:" + JSON.stringify(eventToSave) + "}",
        url: "FullcalenderwithPagemethod.aspx/AddEvents",
        dataType: "json",
        success: function (data) {
            $('div[id*=fullcal]').fullCalendar('renderEvent', event, true);
            $("#eventToAdd").dialog("close");
        },
        error: function (XMLHttpRequest, textStatus, errorThrown) {
            debugger;
        }
    });
}
What we are doing here is in line 2 we are creating two JavaScript objects event and eventToSave and line 3-14 we are assigning the values from the popup. And finally we are saving the data to server using ajax call. Why we have taken two objects here is event data of the calender has different property name and the server event have different name. Once the saving of event is successful we are adding the event object to the calendar using line number 24. The page method using for this is as follows-
[System.Web.Services.WebMethod]
public static bool AddEvents(Event eventdata)
{
    List events;
    if (HttpContext.Current.Session["events"] != null)
        events = (List)HttpContext.Current.Session["events"];
    else
        events = new List();
    events.Add(eventdata);
    HttpContext.Current.Session["events"] = events;
    return true;
}
For this example we have used in memory event object. We can easily replace it with proper database driven. The complete modified code for this is available here for download.

Monday, March 19, 2012

Dynamic galleriffic using pagemethod / webmethod in asp.net

In this post we are going to explore using Galleriffic jQuery plugin with asp.net web method/page method /web service. Also we will see how to change the image source dynamically. The detail of the plugin available here. First lets quickly go through the plugin usage-

First of all we need to add the following script files for working with Galleriffic-
<link rel="stylesheet" href="http://www.twospy.com/galleriffic/css/basic.css" type="text/css" />
    <link rel="stylesheet" href="http://www.twospy.com/galleriffic/css/galleriffic-2.css"
        type="text/css" />
    <script type="text/javascript" src="http://www.twospy.com/galleriffic/js/jquery-1.3.2.js"></script>
    <script type="text/javascript" src="http://www.twospy.com/galleriffic/js/jquery.galleriffic.js"></script>
    <script type="text/javascript" src="http://www.twospy.com/galleriffic/js/jquery.opacityrollover.js"></script>
The opacityrollover js file is optional. And also if we want we can define our own CSS files.

The HTML needed for the plugin is as follows-
<div id="container">
    <div id="gallery" class="content">
        <div id="controls" class="controls">
        </div>
        <div class="slideshow-container">
            <div id="loading" class="loader">
            </div>
            <div id="slideshow" class="slideshow">
            </div>
        </div>
        <div id="caption" class="caption-container">
        </div>
    </div>
    <div id="thumbs" class="navigation">
        <ul class="thumbs noscript" id="containerID">
            <li>
                <a class="thumb" name="drop" href="http://www.gallery2c.com/admin/Upload/FullImage/moda01.jpg"
                    title="Title #1">
                    <img src="http://www.gallery2c.com/admin/Upload/ThumbNail/moda01.jpg" alt="Title #1" />
                </a>
                <div class="caption">
                    Any html can be placed here ...
                </div>
            </li>
            .
            .
            .
            .
            .
        </ul>
    </div>
    <div style="clear: both;">
    </div>
</div>
Lets explain the HTML a little more. Line 3-4 is used for adding buttons of the slideshow(Play/Stop slideshow, Next image, previous image). Line 5-10 is used for showing the big image where line 6-7 is used to show the loading effect while the image is getting loaded and line 8-9 is used to show the actual image. And line 11-12 is used to show any additional information for the image. And the line 14-30 is used to add the image information. In that UL represent the image container. And each LI correspond to a image. It contains many information. Image tag in the LI represent the thumbnail image and the href of the container anchor represent the image that will be shown as a big image. Finally the div with class caption can be used as a container of additional information. The additional information can be of type HTML.

We are also going to use an additional select box as an option to change the data source for the plugin. The code goes here-
<select id="changeGallery">
    <option value="gett" selected="selected">Gallery 1</option>
    <option value="moda">Gallery 2</option>
</select>
Now to activate the plugin with rollover we call use the following code block-
var onMouseOutOpacity = 0.67;
$('#thumbs ul.thumbs li').opacityrollover({
    //add all option here
});

// Initialize Advanced Galleriffic Gallery
var gallery = $('#thumbs').galleriffic({
    //add all option here
});
So for enabling the Galleriffic we are going to use the following code-
function attachGallery() {
    var onMouseOutOpacity = 0.67;
    $('#thumbs ul.thumbs li').opacityrollover({
        mouseOutOpacity: onMouseOutOpacity,
        mouseOverOpacity: 1.0,
        fadeSpeed: 'fast',
        exemptionSelector: '.selected'
    });

    galleryVar = $('#thumbs').galleriffic({
        delay: 2500,
        numThumbs: 15,
        preloadAhead: 10,
        enableTopPager: true,
        enableBottomPager: true,
        maxPagesToShow: 7,
        imageContainerSel: '#slideshow',
        controlsContainerSel: '#controls',
        captionContainerSel: '#caption',
        loadingContainerSel: '#loading',
        renderSSControls: true,
        renderNavControls: true,
        playLinkText: 'Play Slideshow',
        pauseLinkText: 'Pause Slideshow',
        prevLinkText: '&lsaquo; Previous Photo',
        nextLinkText: 'Next Photo &rsaquo;',
        nextPageLinkText: 'Next &rsaquo;',
        prevPageLinkText: '&lsaquo; Prev',
        enableHistory: false,
        autoStart: false,
        syncTransitions: true,
        defaultTransitionDuration: 900,
        onSlideChange: function (prevIndex, nextIndex) {
            this.find('ul.thumbs').children()
     .eq(prevIndex).fadeTo('fast', onMouseOutOpacity).end()
     .eq(nextIndex).fadeTo('fast', 1.0);
        },
        onPageTransitionOut: function (callback) {
            this.fadeTo('fast', 0.0, callback);
        },
        onPageTransitionIn: function () {
            this.fadeTo('fast', 1.0);
        }
    });
}
Now to implement the dynamic Galleriffic, lets remove all the LI's form the UL container. And let add a hidden block of LI that we will be using as a template. The code block is as follows-
<div id="itemContainer" style="display: none">
    <li><a class="thumb" name="drop" href="http://www.gallery2c.com/admin/Upload/FullImage/moda01.jpg"
        title="Title #1">
        <img src="http://www.gallery2c.com/admin/Upload/ThumbNail/moda01.jpg" alt="Title #1" />
    </a>
        <div class="caption">
            Any html can be placed here ...
        </div>
    </li>
</div>
Now to make it database driven we need to do the following-
  1. Clone the hidden LI
  2. Change HREF and TITLE of the anchor tag using database values
  3. Change SRC and ALT of the image tag using database values
  4. Change the caption div inner HTML with database value
  5. Append the cloned LI to the container UL
  6. Repeat the process for all images
Now let us have some asp.net page method or web method that will return images that need to be added dynamically. It goes here-
[WebMethod]
public static object GetImageDetail(string id)
{
    var imageData = new { ImageID = 0, URL = string.Format("http://www.gallery2c.com/admin/Upload/FullImage/{0}01.jpg",id), Thumb = string.Format("http://www.gallery2c.com/admin/Upload/ThumbNail/{0}01.jpg",id), Title = "Title 0", Caption = "Caption 0" };
    var imageDataList = (new[] { imageData }).ToList();
    for (int i = 2; i < 10; i++)
        imageDataList.Add(new { ImageID = 0, URL = string.Format("http://www.gallery2c.com/admin/Upload/FullImage/{0}0{1}.jpg", id, i), Thumb = string.Format("http://www.gallery2c.com/admin/Upload/ThumbNail/{0}0{1}.jpg", id, i), Title = string.Format("Title {0}", i), Caption = string.Format("Caption {0}", i) });
    for (int i = 10; i < 20; i++)
        imageDataList.Add(new { ImageID = 0, URL = string.Format("http://www.gallery2c.com/admin/Upload/FullImage/{0}{1}.jpg", id, i), Thumb = string.Format("http://www.gallery2c.com/admin/Upload/ThumbNail/{0}{1}.jpg", id, i), Title = string.Format("Title {0}", i), Caption = string.Format("Caption {0}", i) });
    return imageDataList;
} 
Here I have taken the help of Gallery2c.com for images. And the jQuery code used to dynamically load the images goes here-
var templete, containerVar;
jQuery(document).ready(function ($) {
    templete = $("#itemContainer li");
    containerVar = $("#containerID");
    getData();
});
function getData() {
    $.ajax({
        type: "POST",
        contentType: "application/json",
        data: "{id:'gett'}",
        url: "Clear ALL images in the Galleriffic jquery plugin and Insert new images using jquery or javas.aspx/GetImageDetail",
        dataType: "json",
        success: function (data) {
            $(data.d).each(function (i, item) {
                containerVar.append(templete.clone());
                containerVar.find("li:last a.thumb").attr({ "href": item.URL, "Title": item.Title });
                containerVar.find("li:last a.thumb img").attr({ "src": item.Thumb, "Title": item.Title });
                containerVar.find("li:last .caption").html(item.Caption);
            });
            attachGallery();
        },
        error: function (XMLHttpRequest, textStatus, errorThrown) {
            debugger;
        }
    });
    $('div.navigation').css({ 'width': '300px', 'float': 'left' });
    $('div.content').css('display', 'block');
}
And to dynamically change the datasource in the plugin we can call the getData() method on the change of the previously added dropdown. The code is as below-
$("#changeGallery").change(getData);
And also we need to remove the content of the container UL before changing the content of the UL. So, at the start of the getData() method we can append the code containerVar.empty();. But there is a small problem, if we play the slide show and then change the dropdown selection. Then the slide show shows wrong image in the big image. It shows the previous datasource images. So, before changing the data source we can stop the slide show and then change the source. The final code looks like-
        var templete, containerVar;
        jQuery(document).ready(function ($) {
            templete = $("#itemContainer li");
            containerVar = $("#containerID");
            getData();
            $("#changeGallery").change(getData);
        });

        function getData() {
            try {
                galleryVar.pause();
            }
            catch (ex) {
            }
            containerVar.empty();
            $.ajax({
                type: "POST",
                contentType: "application/json",
                data: "{id:'" + $("#changeGallery").val() + "'}",
                url: "Clear ALL images in the Galleriffic jquery plugin and Insert new images using jquery or javas.aspx/GetImageDetail",
                dataType: "json",
                success: function (data) {
                    $(data.d).each(function (i, item) {
                        containerVar.append(templete.clone());
                        containerVar.find("li:last a.thumb").attr({ "href": item.URL, "Title": item.Title });
                        containerVar.find("li:last a.thumb img").attr({ "src": item.Thumb, "Title": item.Title });
                        containerVar.find("li:last .caption").html(item.Caption);
                    });
                    attachGallery();
                },
                error: function (XMLHttpRequest, textStatus, errorThrown) {
                    debugger;
                }
            });
            $('div.navigation').css({ 'width': '300px', 'float': 'left' });
            $('div.content').css('display', 'block');
        }
You can download the code form here.

Sunday, March 11, 2012

Copy or duplicate column data in a table using context menu

This is a simple post used to copy data in a cell of a table to other cells of the same column. For this post we will be using a very simple HTML layout as follows-
<table>
<tr>
<th>data 1</th><th>data 2</th>
</tr>
<tr>
<td><input type="text" /> </td>
</tr>
<tr>
<td><input type="text" /> </td>
</tr>
<tr>
<td><input type="text" /> </td>
</tr>
<tr>
<td><input type="text" /> </td>
</tr>
<tr>
<td><input type="text" /> </td>
</tr>
</table>
For context menu we are going to use this plugin.

For content menu we are using the following HTML for the menu content, which include two options- copy and cancel. HTML for the context menu is as follows-
    <ul id="myMenu" class="contextMenu">
<li class="copy"><a href="#copy">Copy value</a></li>
<li class="quit separator"><a href="#cancel">Cancel</a></li>
</ul>
For implementing the context menu we need to take the following files references or we can download from the desired location-
    <script src="http://ajax.aspnetcdn.com/ajax/jQuery/jquery-1.5.js" type="text/javascript"></script>
<script src="http://labs.abeautifulsite.net/archived/jquery-contextMenu/demo/jquery.contextMenu.js"
type="text/javascript"></script>
<link href="http://labs.abeautifulsite.net/archived/jquery-contextMenu/demo/jquery.contextMenu.css"
rel="stylesheet" type="text/css" />
Now we can use following JavaScript code for copying/duplicating the data in a column-
    <script type="text/javascript">
$(document).ready(function () {
$("table input").contextMenu({
menu: 'myMenu'
}, function (action, el, pos) {
if (action == "copy") {
index = el.closest("tr").children().index(el.parent()[0]);
$("table tr").each(function (i, item) {
$(item).find("td:eq(" + index + ") input").val(el.val());
})
}
});
});
</script>

Friday, March 2, 2012

Binding, posting to a Dictionary in MVC 3 using jQuery ajax

This is a continuation of the previous two posts-
  1. Posting an array or generic list of string to asp.net MVC 3 using jQuery ajax
  2. Posting and binding generic list or array of complex object in MVC 3 using jQuery ajax
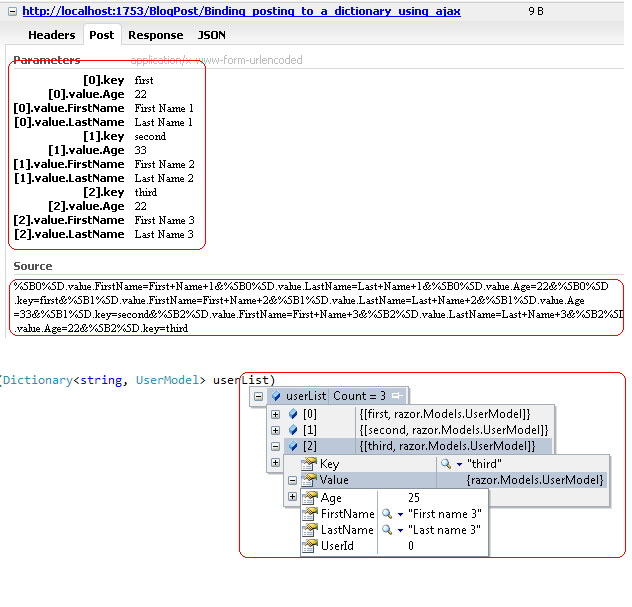
In this post we are going to discuss how to post data to a Dictionary using jQuery ajax. Lets have a simple model from the previous post and pass value to the action method as dictionary of the model we get the following controller method-
[HttpPost]
public ActionResult Binding_posting_to_a_dictionary_using_ajax(Dictionary<string, UserModel> userList)
{
    return PartialView("Success");
}
To work with dictionary the default model binder will accept the data in a particular format. If we consider key of the first element of the dictionary as firstkey then we have to give the name of the input parameter as [0].value.ModelPropertyName. So, for the first item we can give the names like-
<input name="[0].key" value="firstkey" type="hidden">
<input name="[0].value.FirstName" value="" type="text">
<input name="[0].value.LastName" value="" type="text">
<input name="[0].value.Age" value="" type="text">
If we see the above code block, we can see there is a hidden field for maintaining the key of the dictionary element and the value of the hidden filed is nothing but the key of the dictionary element.

Below is the code for posting to a dictionary from jQuery ajax-
<div class="data">
    <h4>
        First User</h4>
    <input type="hidden" name="[0].key" value="first" />
    First Name: @Html.TextBox("[0].value.FirstName")
    Last Name: @Html.TextBox("[0].value.LastName")
    Age: @Html.TextBox("[0].value.Age")
</div>
<div class="data">
    <h4>
        Second User</h4>
    <input type="hidden" name="[1].key" value="second" />
    First Name: @Html.TextBox("[1].value.FirstName")
    Last Name: @Html.TextBox("[1].value.LastName")
    Age: @Html.TextBox("[1].value.Age")
</div>
<div class="data">
    <h4>
        Third User</h4>
    <input type="hidden" name="[2].key" value="third" />
    First Name: @Html.TextBox("[2].value.FirstName")
    Last Name: @Html.TextBox("[2].value.LastName")
    Age: @Html.TextBox("[2].value.Age")
</div>
<input type="button" id="submitData" value="Submit data" />
<script type="text/javascript">
    $(document).ready(function () {
        $("#submitData").click(function () {
            var datatopost = new Object();
            $(".data").each(function (i, item) {
                datatopost[$(item).find("input[name*=FirstName]").attr("name")] = $(item).find("input[name*=FirstName]").val();
                datatopost[$(item).find("input[name*=LastName]").attr("name")] = $(item).find("input[name*=LastName]").val();
                datatopost[$(item).find("input[name*=Age]").attr("name")] = $(item).find("input[name*=Age]").val();
                datatopost[$(item).find("input[name*=key]").attr("name")] = $(item).find("input[name*=key]").val();
            });
            $.ajax({
                url: '@Url.Action("Binding_posting_to_a_dictionary_using_ajax")',
                type: 'POST',
                traditional: true,
                data: datatopost,
                dataType: "json",
                success: function (response) {
                    alert(response);
                },
                error: function (xhr) {
                    alert(xhr);

                }
            });
        });
    });
</script>
[HttpPost]
       [HttpPost]
        public JsonResult Binding_posting_to_a_dictionary_using_ajax(Dictionary<string, UserModel> userList)
        {
            return Json("Success");
        }
Explanation of the jQuery code is given in the previous post. We can check the input data of the ajax call and the posted value of dictionary data in the image below-

Thursday, March 1, 2012

Posting and binding generic list or array of complex object in MVC 3 using jQuery ajax

This post is an extension of the previous post. Please go through the previous post before proceeding with this. In this post we are going to discuss about posting a generic list or array of complex object from jQuery ajax.

Before proceeding with the solution, lets see how the posting of list works in case of a normal form post. To start with lets have the following model, view and controller actions-
    public class UserModel
    {
        public int UserId { get; set; }
        public string FirstName { get; set; }
        public string LastName { get; set; }
        public int Age { get; set; }
    }
@model List<razor.Models.UserModel>
           
@using (Html.BeginForm())
{
    for (int i = 0; i < Model.Count; i++)
    {
        <div class="data">
        <h4>User ID: @Model[i].UserId</h4>
        First Name: @Html.TextBoxFor(m => m[i].FirstName)
        Last Name: @Html.TextBoxFor(m => m[i].LastName)
        Age: @Html.TextBoxFor(m => m[i].Age)
        <br /><br />
        </div> 
    }
    <input type="submit" value="Submit data" />
}

I think the above model and view are self explanatory.
        public ActionResult Binding_posting_to_generic_collection_of_custom_type_using_ajax()
        {
            List<UserModel> users = new List<UserModel>();
            for (int i = 0; i < 5; i++)
            {
                users.Add(new UserModel() {UserId=i, FirstName = "FirstName " + i.ToString(), LastName = "LastName " + i.ToString(), Age = i +34});
            }
            return PartialView(users);
        }
        [HttpPost]
        public ActionResult Binding_posting_to_generic_collection_of_custom_type_using_ajax(List<UserModel> userList)
        {
            return PartialView("Success");
        }
In case of controller action, the first action is used to create some in-memory user object and render the view. The second action method is used to accept the posted data from the view.

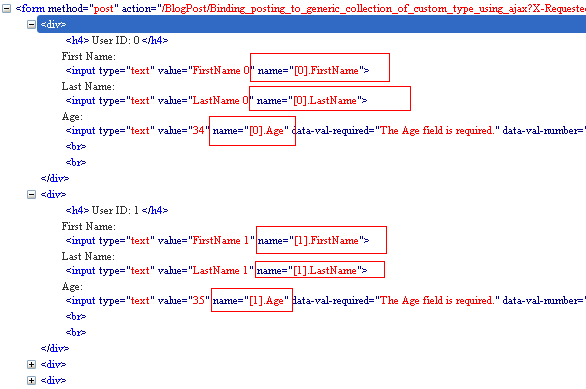
Now if we study the generated HTML by the view engine, we can see the pattern of HTML generation for the name attribute of the text boxes. Each property of a user object in the list got the name as [index].PropertyName. As we are binding to a collection, the default model binder will search for the values for the properties of the User class that are prefixed by an index. That's why the view engine is generating the name attribute of that fashion.

So, to pass the data using jQuery ajax we need to pass the querystring parameter of that fashion for model binder. So, first thing that can come to mind we will use traditional:true in the ajax call like in the previous post and ajax() method will internally use param() to build the querystring format for us. But as I have studied, jquery 1.7 version does not support for getting querystring format for array of complex object. That is if we execute the following code-
unescape($.param(
 [{FirstName:"FN 1", LastName:"LN 1", Age:35},
 {FirstName:"FN 2", LastName:"LN 2", Age:36},
 {FirstName:"FN 3", LastName:"LN 3", Age:37}]
 ))
we get the following result-
undefined=undefined&undefined=undefined&undefined=undefined
So, what we can do is write a little jQuery code and also use traditional:true of the ajax call to achieve this. The final jQuery code for doing this as below-
@model List<razor.Models.UserModel>
@for (int i = 0; i < Model.Count; i++)
{
    <div class="data">
        <h4>
            User ID: @Model[i].UserId</h4>
        First Name: @Html.TextBoxFor(m => m[i].FirstName)
        Last Name: @Html.TextBoxFor(m => m[i].LastName)
        Age: @Html.TextBoxFor(m => m[i].Age)
    </div> 
}
<input type="button" id="submitData" value="Submit data" />
<script type="text/javascript">
    $(document).ready(function () {
        $("#submitData").click(function () {
            var datatopost=new Object();
            $(".data").each(function (i, item) {
                datatopost["[" + i + "].FirstName"] = $(item).find("input[name*=FirstName]").val();
                datatopost["[" + i + "].LastName"] = $(item).find("input[name*=LastName]").val();
                datatopost["[" + i + "].Age"] = $(item).find("input[name*=Age]").val();
            });
            $.ajax({
                url: '@Url.Action("Binding_posting_to_generic_collection_of_custom_type_using_ajax")',
                type: 'POST',
                traditional: true,
                data: datatopost,
                dataType: "json",
                success: function (response) {
                    alert(response);
                },
                error: function (xhr) {
                    alert(xhr);
                }
            });
        });
    });
</script>
What we are doing here is looping through all the data and manually building a JavaScript object datatopost with properties like-
"[index].FirstName"
"[index].LastName"
"[index].Age"
So the actual assignment will be something like-
datatopost["[0].FirstName"]="First Name 0"
datatopost["[0].LastName"]="Last Name 0"
datatopost["[0].Age"]="35"

datatopost["[1].FirstName"]="First Name 1"
datatopost["[1].LastName"]="Last Name 1"
datatopost["[1].Age"]="36"

and so on...
Now we have our JavaScript object datatopost is ready, which is a plain JavaScript object with some properties. And now we can use traditional:true to automate the query string format.

Now we will be able to successfully post data from jQuery ajax. We can also see the data posted during the ajax request in the image below-


Note:
We can also change the logic of creation of datatopost like below-
$(".data").each(function (i, item) {
   datatopost[$(item).find("input[name*=FirstName]").attr("name")] = $(item).find("input[name*=FirstName]").val();
   datatopost[$(item).find("input[name*=LastName]").attr("name")] = $(item).find("input[name*=LastName]").val();
   datatopost[$(item).find("input[name*=Age]").attr("name")] = $(item).find("input[name*=Age]").val();
});

Wednesday, February 29, 2012

Posting an array or generic list of string to asp.net MVC 3 using jQuery ajax

This is a simple post that we will be using to post an array of value type or a generic list of value. We will be using string[] and List for our example. Lets have a vary basic controller action method that will be used for this purpose
        [HttpPost]
        public JsonResult Binding_posting_to_Array_or_List(string[] data)
        {
            return Json("success");
        }
Or
        [HttpPost]
        public JsonResult Binding_posting_to_Array_or_List(List data)
        {
            return Json("success");
        }
Now lets have a sample jQuery code to call the controller method as below-
 <script type="text/javascript">
    $(document).ready(function () {
        $("#btn").click(function () {
            $.ajax({
                url: '@Url.Action("Binding_posting_to_Array_or_List")',
                type: 'POST',
                data: { data: ["value 1", "value 2", "value 3"] },
                dataType: "json",
                success: function (response) {
                    alert(response);
                },
                error: function (xhr) {
                    debugger;
                    alert(xhr);

                }
            });
        });
    });
</script>
<input type="button" id="btn" value="Save data" />
But if we check the posted value at runtime in controller, we will find null value got posted-


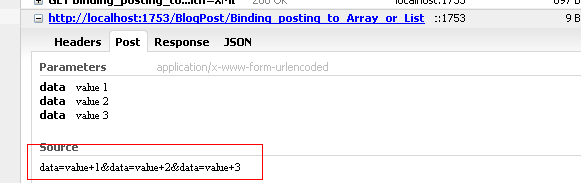
The reason is MVC expects the data in querystring pattern. And we are passing data as a JSON object. The code will work if we pass data as querystring-
data: 'data=value 1&data=value 2&data=value 3',
Now jQuery ajax has a built in feature to solve this problem. That is the use of traditional option in the ajax call. If we pass the data as JSON object and set the option traditional:true,, jQuery will internally convert input data in querystring format. jQuery ajax method does this by using jQuery.param() API method. So, the final working sample of ajax call is as below-
 <script type="text/javascript">
     $(document).ready(function () {
        $("#btn").click(function () {
            $.ajax({
                url: '@Url.Action("Binding_posting_to_Array_or_List")',
                type: 'POST',
                traditional:true,
                data: {data:["value 1", "value 2", "value 3"]},
                dataType: "json",
                success: function (response) {
                    alert(response);
                },
                error: function (xhr) {
                    debugger;
                    alert(xhr);

                }
            });
        });
    }); 
</script>
Following image shows how the value gets converted to querystring format after using traditional option in the ajax call. This image is taken during run time using Firefox.