Sunday, March 11, 2012

Copy or duplicate column data in a table using context menu

This is a simple post used to copy data in a cell of a table to other cells of the same column. For this post we will be using a very simple HTML layout as follows-
<table>
<tr>
<th>data 1</th><th>data 2</th>
</tr>
<tr>
<td><input type="text" /> </td>
</tr>
<tr>
<td><input type="text" /> </td>
</tr>
<tr>
<td><input type="text" /> </td>
</tr>
<tr>
<td><input type="text" /> </td>
</tr>
<tr>
<td><input type="text" /> </td>
</tr>
</table>
For context menu we are going to use this plugin.

For content menu we are using the following HTML for the menu content, which include two options- copy and cancel. HTML for the context menu is as follows-
    <ul id="myMenu" class="contextMenu">
<li class="copy"><a href="#copy">Copy value</a></li>
<li class="quit separator"><a href="#cancel">Cancel</a></li>
</ul>
For implementing the context menu we need to take the following files references or we can download from the desired location-
    <script src="http://ajax.aspnetcdn.com/ajax/jQuery/jquery-1.5.js" type="text/javascript"></script>
<script src="http://labs.abeautifulsite.net/archived/jquery-contextMenu/demo/jquery.contextMenu.js"
type="text/javascript"></script>
<link href="http://labs.abeautifulsite.net/archived/jquery-contextMenu/demo/jquery.contextMenu.css"
rel="stylesheet" type="text/css" />
Now we can use following JavaScript code for copying/duplicating the data in a column-
    <script type="text/javascript">
$(document).ready(function () {
$("table input").contextMenu({
menu: 'myMenu'
}, function (action, el, pos) {
if (action == "copy") {
index = el.closest("tr").children().index(el.parent()[0]);
$("table tr").each(function (i, item) {
$(item).find("td:eq(" + index + ") input").val(el.val());
})
}
});
});
</script>

Friday, March 2, 2012

Binding, posting to a Dictionary in MVC 3 using jQuery ajax

This is a continuation of the previous two posts-
  1. Posting an array or generic list of string to asp.net MVC 3 using jQuery ajax
  2. Posting and binding generic list or array of complex object in MVC 3 using jQuery ajax
In this post we are going to discuss how to post data to a Dictionary using jQuery ajax. Lets have a simple model from the previous post and pass value to the action method as dictionary of the model we get the following controller method-
[HttpPost]
public ActionResult Binding_posting_to_a_dictionary_using_ajax(Dictionary<string, UserModel> userList)
{
    return PartialView("Success");
}
To work with dictionary the default model binder will accept the data in a particular format. If we consider key of the first element of the dictionary as firstkey then we have to give the name of the input parameter as [0].value.ModelPropertyName. So, for the first item we can give the names like-
<input name="[0].key" value="firstkey" type="hidden">
<input name="[0].value.FirstName" value="" type="text">
<input name="[0].value.LastName" value="" type="text">
<input name="[0].value.Age" value="" type="text">
If we see the above code block, we can see there is a hidden field for maintaining the key of the dictionary element and the value of the hidden filed is nothing but the key of the dictionary element.

Below is the code for posting to a dictionary from jQuery ajax-
<div class="data">
    <h4>
        First User</h4>
    <input type="hidden" name="[0].key" value="first" />
    First Name: @Html.TextBox("[0].value.FirstName")
    Last Name: @Html.TextBox("[0].value.LastName")
    Age: @Html.TextBox("[0].value.Age")
</div>
<div class="data">
    <h4>
        Second User</h4>
    <input type="hidden" name="[1].key" value="second" />
    First Name: @Html.TextBox("[1].value.FirstName")
    Last Name: @Html.TextBox("[1].value.LastName")
    Age: @Html.TextBox("[1].value.Age")
</div>
<div class="data">
    <h4>
        Third User</h4>
    <input type="hidden" name="[2].key" value="third" />
    First Name: @Html.TextBox("[2].value.FirstName")
    Last Name: @Html.TextBox("[2].value.LastName")
    Age: @Html.TextBox("[2].value.Age")
</div>
<input type="button" id="submitData" value="Submit data" />
<script type="text/javascript">
    $(document).ready(function () {
        $("#submitData").click(function () {
            var datatopost = new Object();
            $(".data").each(function (i, item) {
                datatopost[$(item).find("input[name*=FirstName]").attr("name")] = $(item).find("input[name*=FirstName]").val();
                datatopost[$(item).find("input[name*=LastName]").attr("name")] = $(item).find("input[name*=LastName]").val();
                datatopost[$(item).find("input[name*=Age]").attr("name")] = $(item).find("input[name*=Age]").val();
                datatopost[$(item).find("input[name*=key]").attr("name")] = $(item).find("input[name*=key]").val();
            });
            $.ajax({
                url: '@Url.Action("Binding_posting_to_a_dictionary_using_ajax")',
                type: 'POST',
                traditional: true,
                data: datatopost,
                dataType: "json",
                success: function (response) {
                    alert(response);
                },
                error: function (xhr) {
                    alert(xhr);

                }
            });
        });
    });
</script>
[HttpPost]
       [HttpPost]
        public JsonResult Binding_posting_to_a_dictionary_using_ajax(Dictionary<string, UserModel> userList)
        {
            return Json("Success");
        }
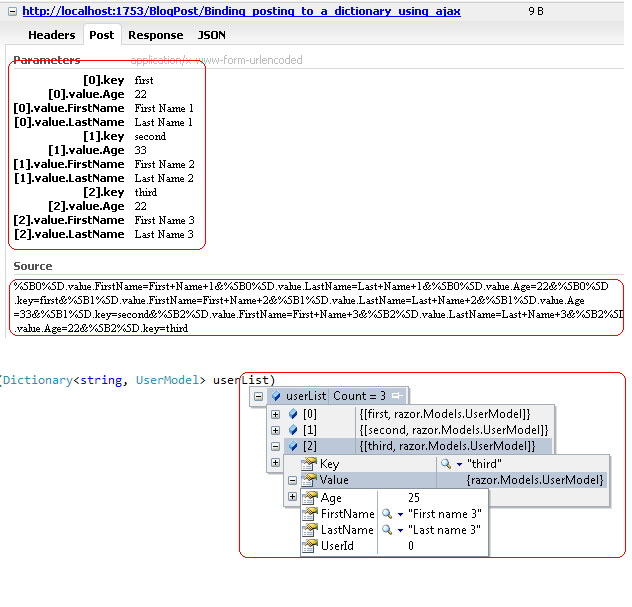
Explanation of the jQuery code is given in the previous post. We can check the input data of the ajax call and the posted value of dictionary data in the image below-

Thursday, March 1, 2012

Posting and binding generic list or array of complex object in MVC 3 using jQuery ajax

This post is an extension of the previous post. Please go through the previous post before proceeding with this. In this post we are going to discuss about posting a generic list or array of complex object from jQuery ajax.

Before proceeding with the solution, lets see how the posting of list works in case of a normal form post. To start with lets have the following model, view and controller actions-
    public class UserModel
    {
        public int UserId { get; set; }
        public string FirstName { get; set; }
        public string LastName { get; set; }
        public int Age { get; set; }
    }
@model List<razor.Models.UserModel>
           
@using (Html.BeginForm())
{
    for (int i = 0; i < Model.Count; i++)
    {
        <div class="data">
        <h4>User ID: @Model[i].UserId</h4>
        First Name: @Html.TextBoxFor(m => m[i].FirstName)
        Last Name: @Html.TextBoxFor(m => m[i].LastName)
        Age: @Html.TextBoxFor(m => m[i].Age)
        <br /><br />
        </div> 
    }
    <input type="submit" value="Submit data" />
}

I think the above model and view are self explanatory.
        public ActionResult Binding_posting_to_generic_collection_of_custom_type_using_ajax()
        {
            List<UserModel> users = new List<UserModel>();
            for (int i = 0; i < 5; i++)
            {
                users.Add(new UserModel() {UserId=i, FirstName = "FirstName " + i.ToString(), LastName = "LastName " + i.ToString(), Age = i +34});
            }
            return PartialView(users);
        }
        [HttpPost]
        public ActionResult Binding_posting_to_generic_collection_of_custom_type_using_ajax(List<UserModel> userList)
        {
            return PartialView("Success");
        }
In case of controller action, the first action is used to create some in-memory user object and render the view. The second action method is used to accept the posted data from the view.

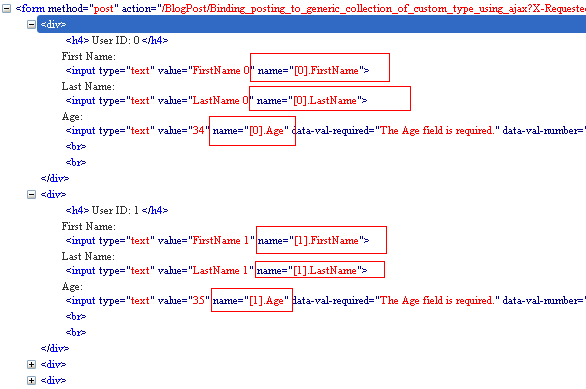
Now if we study the generated HTML by the view engine, we can see the pattern of HTML generation for the name attribute of the text boxes. Each property of a user object in the list got the name as [index].PropertyName. As we are binding to a collection, the default model binder will search for the values for the properties of the User class that are prefixed by an index. That's why the view engine is generating the name attribute of that fashion.

So, to pass the data using jQuery ajax we need to pass the querystring parameter of that fashion for model binder. So, first thing that can come to mind we will use traditional:true in the ajax call like in the previous post and ajax() method will internally use param() to build the querystring format for us. But as I have studied, jquery 1.7 version does not support for getting querystring format for array of complex object. That is if we execute the following code-
unescape($.param(
 [{FirstName:"FN 1", LastName:"LN 1", Age:35},
 {FirstName:"FN 2", LastName:"LN 2", Age:36},
 {FirstName:"FN 3", LastName:"LN 3", Age:37}]
 ))
we get the following result-
undefined=undefined&undefined=undefined&undefined=undefined
So, what we can do is write a little jQuery code and also use traditional:true of the ajax call to achieve this. The final jQuery code for doing this as below-
@model List<razor.Models.UserModel>
@for (int i = 0; i < Model.Count; i++)
{
    <div class="data">
        <h4>
            User ID: @Model[i].UserId</h4>
        First Name: @Html.TextBoxFor(m => m[i].FirstName)
        Last Name: @Html.TextBoxFor(m => m[i].LastName)
        Age: @Html.TextBoxFor(m => m[i].Age)
    </div> 
}
<input type="button" id="submitData" value="Submit data" />
<script type="text/javascript">
    $(document).ready(function () {
        $("#submitData").click(function () {
            var datatopost=new Object();
            $(".data").each(function (i, item) {
                datatopost["[" + i + "].FirstName"] = $(item).find("input[name*=FirstName]").val();
                datatopost["[" + i + "].LastName"] = $(item).find("input[name*=LastName]").val();
                datatopost["[" + i + "].Age"] = $(item).find("input[name*=Age]").val();
            });
            $.ajax({
                url: '@Url.Action("Binding_posting_to_generic_collection_of_custom_type_using_ajax")',
                type: 'POST',
                traditional: true,
                data: datatopost,
                dataType: "json",
                success: function (response) {
                    alert(response);
                },
                error: function (xhr) {
                    alert(xhr);
                }
            });
        });
    });
</script>
What we are doing here is looping through all the data and manually building a JavaScript object datatopost with properties like-
"[index].FirstName"
"[index].LastName"
"[index].Age"
So the actual assignment will be something like-
datatopost["[0].FirstName"]="First Name 0"
datatopost["[0].LastName"]="Last Name 0"
datatopost["[0].Age"]="35"

datatopost["[1].FirstName"]="First Name 1"
datatopost["[1].LastName"]="Last Name 1"
datatopost["[1].Age"]="36"

and so on...
Now we have our JavaScript object datatopost is ready, which is a plain JavaScript object with some properties. And now we can use traditional:true to automate the query string format.

Now we will be able to successfully post data from jQuery ajax. We can also see the data posted during the ajax request in the image below-


Note:
We can also change the logic of creation of datatopost like below-
$(".data").each(function (i, item) {
   datatopost[$(item).find("input[name*=FirstName]").attr("name")] = $(item).find("input[name*=FirstName]").val();
   datatopost[$(item).find("input[name*=LastName]").attr("name")] = $(item).find("input[name*=LastName]").val();
   datatopost[$(item).find("input[name*=Age]").attr("name")] = $(item).find("input[name*=Age]").val();
});

Wednesday, February 29, 2012

Posting list of text box values to array or list using MVC 3

Lets describe the problem with example. Lets have the following model and view-
    public class SampleDataModel
    {
        public string Data1 { get; set; }
        public string Data2 { get; set; }
        public string Data3 { get; set; }
        public string Data4 { get; set; }
        public string Data5 { get; set; }
        public string Data6 { get; set; }
    }
@model razor.Models.SampleDataModel

@using (Html.BeginForm())
{
    @Html.TextBoxFor(x => x.Data1) <br />   
    @Html.TextBoxFor(x => x.Data2)<br />
    @Html.TextBoxFor(x => x.Data3)<br />
    @Html.TextBoxFor(x => x.Data4)<br />
    @Html.TextBoxFor(x => x.Data5)<br />
    @Html.TextBoxFor(x => x.Data6)<br />
    <input type="submit" value="Submit data" />
}
Now if we have a controller action method like-
        [HttpPost]
        public ActionResult Posting_list_of_text_to_array_or_list(razor.Models.SampleDataModel data)
        {
            return PartialView("Success");
        }
Then data will get posted properly. Mow suppose in some case we need to post the data to a string array(string[]) or to generic list(List<string>), then how we can do that using the same view.

Its very simple. Lets first check the generated HTML for the view.
<form method="post" action=/BlogPost/Posting_list_of_text_to_array_or_list?X-Requested-With=XMLHttpRequest>
<input id="Data1" type="text" name="Data1"><br>
<input id="Data2" type="text" name="Data2"><br>
<input id="Data3" type="text" name="Data3"><br>
<input id="Data4" type="text" name="Data4"><br>
<input id="Data5" type="text" name="Data5"><br>
<input id="Data6" type="text" name="Data6"><br>
<input value="Submit data" type="submit">
</form>
If we see the HTML, the name of the input box is same as the id of the input box. There is one beauty of the default model binder in MVC 3 that if it finds some form fields with the same name then it try to convert it collection or array. So, we can achieve by changing the name of the input box to the parameter name of the controller action like below-
@model razor.Models.SampleDataModel

<script type="text/javascript">
    $(document).ready(function () {
        $(".similar").attr("name", "data");
    });
</script>

@using (Html.BeginForm())
{
    @Html.TextBoxFor(x => x.Data1, new { @class = "similar" }) <br />   
    @Html.TextBoxFor(x => x.Data2, new { @class = "similar" })<br />
    @Html.TextBoxFor(x => x.Data3, new { @class = "similar" })<br />
    @Html.TextBoxFor(x => x.Data4, new { @class = "similar" })<br />
    @Html.TextBoxFor(x => x.Data5, new { @class = "similar" })<br />
    @Html.TextBoxFor(x => x.Data6, new { @class = "similar" })<br />
    <input type="submit" value="Submit data" />
}
What is done here is simple. Added a CSS class to the text boxes and using jQuery we have set the name attribute of the text boxes to a same value. Now if we add a action method like-
        [HttpPost]
        public ActionResult Posting_list_of_text_to_array_or_list(List data)
        {
            return PartialView("Success");
        }
or
        [HttpPost]
        public ActionResult Posting_list_of_text_to_array_or_list(string[] data)
        {
            return PartialView("Success");
        }
The values of the text boxes will get posted without any issue.

Posting an array or generic list of string to asp.net MVC 3 using jQuery ajax

This is a simple post that we will be using to post an array of value type or a generic list of value. We will be using string[] and List for our example. Lets have a vary basic controller action method that will be used for this purpose
        [HttpPost]
        public JsonResult Binding_posting_to_Array_or_List(string[] data)
        {
            return Json("success");
        }
Or
        [HttpPost]
        public JsonResult Binding_posting_to_Array_or_List(List data)
        {
            return Json("success");
        }
Now lets have a sample jQuery code to call the controller method as below-
 <script type="text/javascript">
    $(document).ready(function () {
        $("#btn").click(function () {
            $.ajax({
                url: '@Url.Action("Binding_posting_to_Array_or_List")',
                type: 'POST',
                data: { data: ["value 1", "value 2", "value 3"] },
                dataType: "json",
                success: function (response) {
                    alert(response);
                },
                error: function (xhr) {
                    debugger;
                    alert(xhr);

                }
            });
        });
    });
</script>
<input type="button" id="btn" value="Save data" />
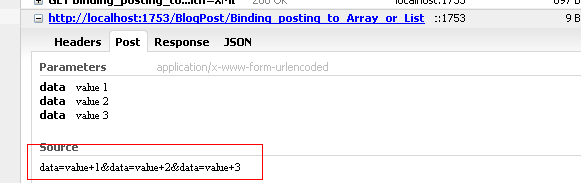
But if we check the posted value at runtime in controller, we will find null value got posted-


The reason is MVC expects the data in querystring pattern. And we are passing data as a JSON object. The code will work if we pass data as querystring-
data: 'data=value 1&data=value 2&data=value 3',
Now jQuery ajax has a built in feature to solve this problem. That is the use of traditional option in the ajax call. If we pass the data as JSON object and set the option traditional:true,, jQuery will internally convert input data in querystring format. jQuery ajax method does this by using jQuery.param() API method. So, the final working sample of ajax call is as below-
 <script type="text/javascript">
     $(document).ready(function () {
        $("#btn").click(function () {
            $.ajax({
                url: '@Url.Action("Binding_posting_to_Array_or_List")',
                type: 'POST',
                traditional:true,
                data: {data:["value 1", "value 2", "value 3"]},
                dataType: "json",
                success: function (response) {
                    alert(response);
                },
                error: function (xhr) {
                    debugger;
                    alert(xhr);

                }
            });
        });
    }); 
</script>

Following image shows how the value gets converted to querystring format after using traditional option in the ajax call. This image is taken during run time using Firefox.


Thursday, February 23, 2012

Using msDropDown with tooltips plugin

In this post we are going to discuss using msDropDown plugin with tooltips plugin. First lets study the post for how to use msDropDown here. We are going to use the source code specified in that code.

To continue with tooltips implementation with msDropDown, we can first explore the generated HTML for the dropdown in the previous post.
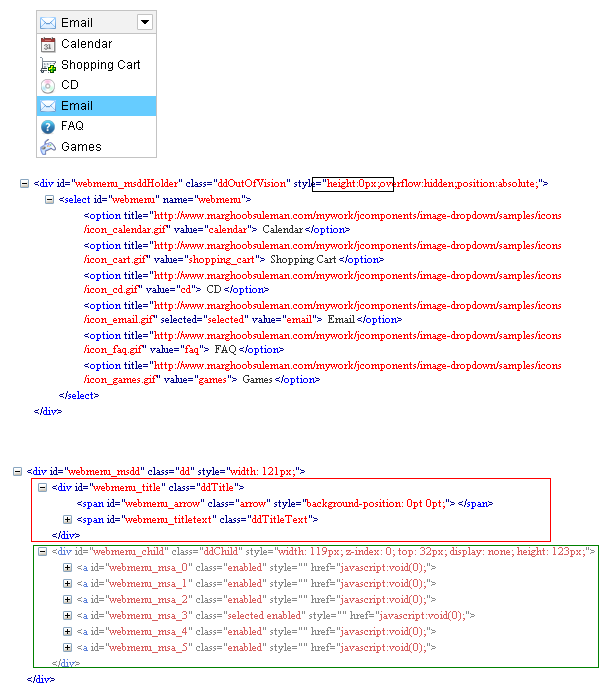
First part(part 1) of the image is the UI of the rendered dropdown. Second part(part 2) is the actual dropdwn we have . And the third part(part 3) of the image is the generated HTML by the msDropDown plugin. Lets study the HTML a little.

If we notice the HTML generated in part 2, the select is inserted in a div and the div height is made to zero. So, the actual dropdown is made hidden. And if we notice the part 3 HTML, we can see the select got converted to a div which contains two child divs. The red box contains the HTML for the selected option. And the green box contains the all options. Each option has converted to anchor(<a> tag) with id like selectID_msa_index. If we notice we can see that each index corresponds to the index of corresponding select option.

Now adding tooltips to the select > option is nothing but adding tooltips to the anchor tag. Let us implement tooltips now. First let us add some dummy attribute to the option tag that represent the tooltip. In this case we are using attribute named tooltipdata like below-
<select name="webmenu" id="webmenu">
        <option value="calendar" tooltipdata="Calendar tip" title="http://www.marghoobsuleman.com/mywork/jcomponents/image-dropdown/samples/icons/icon_calendar.gif">
            Calendar</option>
        <option value="shopping_cart" tooltipdata="Shopping Cart tip" title="http://www.marghoobsuleman.com/mywork/jcomponents/image-dropdown/samples/icons/icon_cart.gif">
            Shopping Cart</option>
        <option value="cd" tooltipdata="CD tip" title="http://www.marghoobsuleman.com/mywork/jcomponents/image-dropdown/samples/icons/icon_cd.gif">
            CD</option>
        <option value="email" selected="selected" tooltipdata="Email tip" title="http://www.marghoobsuleman.com/mywork/jcomponents/image-dropdown/samples/icons/icon_email.gif">
            Email</option>
        <option value="faq" tooltipdata="FAQ tip" title="http://www.marghoobsuleman.com/mywork/jcomponents/image-dropdown/samples/icons/icon_faq.gif">
            FAQ</option>
        <option value="games" tooltipdata="Games tip" title="http://www.marghoobsuleman.com/mywork/jcomponents/image-dropdown/samples/icons/icon_games.gif">
            Games</option>
    </select>
Before implementing tooltip, we need to add the following file references-
<script src="http://jquery.bassistance.de/tooltip/jquery.tooltip.js" type="text/javascript"></script>
    <link href="http://jquery.bassistance.de/tooltip/jquery.tooltip.css" rel="stylesheet"
        type="text/css" />
Now lets modify the msDropDown plugin initialization code. If we go to the plugin documentation we can see that the plugin can accept a function as a parameter that gets called after the plugin initialization happens. So we can add a function like-
<script language="javascript">
        $(document).ready(function (e) {
            try {
                $("#webmenu").msDropDown({ onInit: callAfterInitialization });
            } catch (e) {
                alert(e.message);
            }
        });
        function callAfterInitialization() {
        }
    </script>
In our case we are we are adding a function named callAfterInitialization to onInit parameter of the msDropDown plugin.

Next we can use this function to implement tooltips plugin. As we have already seen the id of the generated anchor selectID_msa_index, we can get the index from the id and find corresponding option from the select. If we can get the option from the select then we can read the value attribute toolltipdata from the option, which is nothing but the tooltip text we need to show in the tooltip of the anchor. We can to this by the following selector. Here this is nothing but the anchor.
$("select[id*=webmenu] option:eq(" + 
this.id.substring(this.id.lastIndexOf("_") + 1) + ")").attr("tooltipdata");
So the full function definition goes like below-
        function callAfterInitialization() {
            $("a[id*=webmenu]").tooltip({
                track: true,
                delay: 0,
                showURL: false,
                fade: 250,
                bodyHandler: function () {
                    return $("select[id*=webmenu] option:eq(" + this.id.substring(this.id.lastIndexOf("_") + 1) + ")").attr("tooltipdata");
                },
                showURL: false
            });
        }
And finally to make sure the tooltip is always on the top, we can change the z-index property of the tooltip to a very higher value.
<style>
        div#tooltip
        {
            z-index: 20000;
        }
    </style>
In this case the tooltip is nothing but a div with id tooltip. You have to check the generated id for your tooltip.

Now if we want to add tooltip to selected item, we can achieve it with little more effort. If we notice part 3, red square section is the HTML for the selected item. The container has a css class named ddTitle. To add tooltip to the selected item is nothing but adding tooltip to the div with class ddTitle. We can do this by enabling tooltip for ddTitle inside document.ready. Code goes here-
$("div[id*=_msdd] div.ddTitle").tooltip({
                track: true,
                delay: 0,
                showURL: false,
                fade: 250,
                bodyHandler: function () {
                    return $("select[id*=" + this.id.substring(0, this.id.indexOf("_") - 1) + "] option:selected").attr("tooltipdata");
                },
                showURL: false
            });
What we are doing in bodyHandler is finding the selected option in the original drop down and adding it as the body of the tooltip. While selected index changes, the msDropDown plugin is also internally changing the selected index of the hidden drop down.

Using msDropDown - a dropdown with icon in the option

msDropDown is a nice plugin. Its a dropdown plugin where we can use icon with the option of the select element. The detail of the plugin can be found here. Implementation goes like below-

We need to add the jQuery and msDropDown script and css file reference. We can download the files form the plugin site given above.
    <script src="http://ajax.aspnetcdn.com/ajax/jQuery/jquery-1.7.js" type="text/javascript"></script>
    <script src="http://www.marghoobsuleman.com/mywork/jcomponents/image-dropdown/samples/msdropdown/js/jquery.dd.js" type="text/javascript"></script>
    <link rel="stylesheet" type="text/css" href="http://www.marghoobsuleman.com/mywork/jcomponents/image-dropdown/samples/msdropdown/dd.css" />
Working principle of the plugin is very simple. We need to add the icon path to the title of the option in select tag. Like below-
<option value="value" title="path of the icon">text</option>
Lets have a sample dropdown for this-
    <select name="webmenu" id="webmenu" onchange="showValue(this.value)">
        <option value="calendar" title="http://www.marghoobsuleman.com/mywork/jcomponents/image-dropdown/samples/icons/icon_calendar.gif">
            Calendar</option>
        <option value="shopping_cart" title="http://www.marghoobsuleman.com/mywork/jcomponents/image-dropdown/samples/icons/icon_cart.gif">
            Shopping Cart</option>
        <option value="cd" title="http://www.marghoobsuleman.com/mywork/jcomponents/image-dropdown/samples/icons/icon_cd.gif">
            CD</option>
        <option value="email" selected="selected" title="http://www.marghoobsuleman.com/mywork/jcomponents/image-dropdown/samples/icons/icon_email.gif">
            Email</option>
        <option value="faq" title="http://www.marghoobsuleman.com/mywork/jcomponents/image-dropdown/samples/icons/icon_faq.gif">
            FAQ</option>
        <option value="games" title="http://www.marghoobsuleman.com/mywork/jcomponents/image-dropdown/samples/icons/icon_games.gif">
            Games</option>
    </select>
Now we can activate the msDropDown by the following JavaScript code-
    <script language="javascript">
        $(document).ready(function (e) {
            try {
                $("#webmenu").msDropDown();
            } catch (e) {
                alert(e.message);
            }
        });
    </script>
Thats all. For various other options we can check the plugin site.